
Soups & Stews
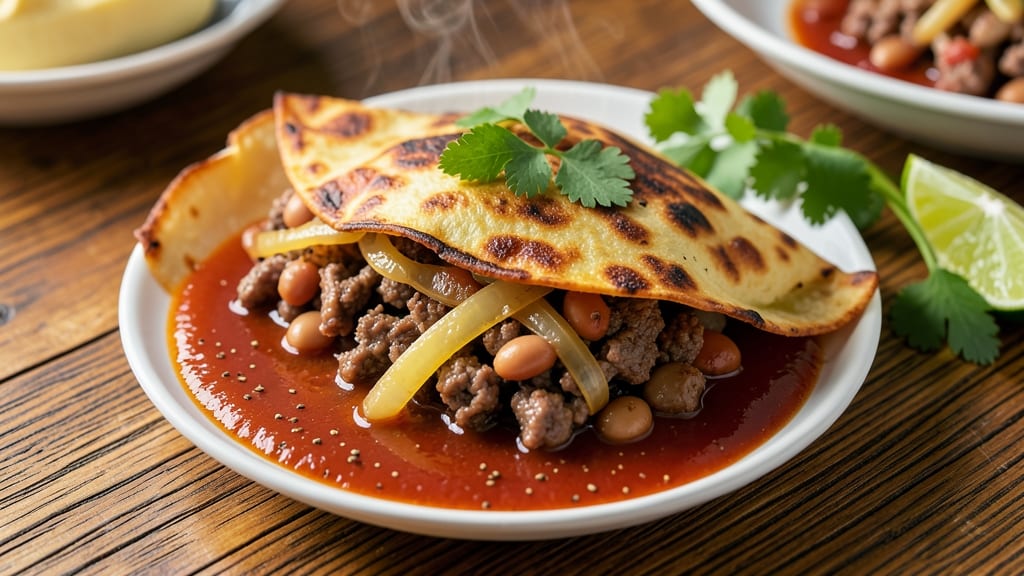
This beef and bean chimichanga recipe delivers the perfect balance of crispy, golden-brown tortillas wrapped around tender spiced beef and hearty beans. The secret lies in a well-seasoned filling that transforms simple ground beef into something deeply flavorful, while the tortillas achieve that irresistible crunch through precise cooking.
I developed this recipe after years of experimenting with Tex-Mex classics, and it's now a crowd-pleaser at every gathering.
The filling starts with ground beef cooked until just browned, then simmered with onions, garlic, and a blend of cumin, chili powder, and oregano that builds rich, earthy flavors. Pinto beans add substance and texture, while a splash of tomato sauce ties everything together.
The key to crispy chimichangas is using large flour tortillas (10 inches works best) and ensuring they're properly sealed before cooking.
By the time you're done, you'll have golden, shatteringly crispy chimichangas that hold their shape perfectly—no soggy tortillas here. The filling stays warm and flavorful inside, with each bite delivering that satisfying crunch followed by tender, seasoned beef and beans.
This recipe serves 4 generously, making it ideal for family dinners or game day gatherings.
Serve with traditional sides like cilantro-lime rice, refried beans, and a dollop of sour cream or guacamole for the full experience. The crispy exterior contrasts beautifully with the warm, savory filling, creating a dish that's both comforting and impressive. Let's get cooking!
Ingredients for beef and bean chimichanga
Fourteen ingredients transform simple ground beef and beans into restaurant-quality chimichangas with crispy tortillas.
| Ingredient | Amount | Notes |
|---|---|---|
| Ground Beef (80/20 Lean-to-Fat Ratio) 🥩 | 1 ½ lb | Coarsely broken for even cooking |
| Large Yellow Onions 🧅 | 1 whole | Diced into 1/4-inch pieces |
| Garlic Cloves 🧄 | 4 cloves | Minced for aromatic depth |
| Canned Pinto Beans 🌾 | 15 oz | Drained and rinsed thoroughly |
| Tomato Sauce (Canned) 🍅 | ½ cup | San Marzano preferred for quality |
| Ground Cumin 🌿 | 1 tbsp | Toasted for enhanced aroma |
| Chili Powder 🌶️ | 1 ½ tbsp | Medium heat variety recommended |
| Dried Oregano 🍃 | 1 tsp | Mexican oregano preferred |
| Salt 🧂 | 1 ½ tsp | Diamond Crystal kosher salt |
| Black Pepper 🌶️ | ½ tsp | Freshly ground for optimal flavor |
| Large Flour Tortillas 🌯 | 4 whole | 10-inch diameter, store-bought |
| Vegetable Oil 🫒 | ½ cup | High smoke point preferred |
| Lemon Juice 🍋 | 1 tbsp | Freshly squeezed for brightness |
| Sour Cream 🧀 | ¼ cup | For serving, optional garnish |
| Fresh Cilantro 🌿 | ¼ cup | Chopped for garnish, stems removed |
The ground beef is the foundation, so 80/20 lean-to-fat ratio is essential for juiciness. Purchase from Costco or local butchers for the best quality—avoid pre-ground beef with fillers. The San Marzano tomato sauce elevates the filling, though any quality canned sauce works. For the beans, pinto beans provide the perfect texture, but black beans or kidney beans can substitute. The 10-inch flour tortillas are crucial; smaller tortillas won't hold enough filling, and larger ones risk tearing during rolling. Look for brands like Mission or La Tortilla Factory at your grocery store's Mexican aisle.
No cumin? Smoked paprika at half the amount adds depth, though the earthy flavor won't be identical. Running short on chili powder? Cayenne pepper or ancho chili powder can intensify heat, but adjust to taste. The vegetable oil should have a high smoke point—avocado or grapeseed oil are excellent alternatives. For extra richness, swap half the tomato sauce for beef broth. The lemon juice is optional but adds a bright contrast to the savory filling—lime juice works equally well. If you prefer a vegetarian option, substitute crumbled tempeh or extra beans for the beef, though the texture will differ slightly.
Store the cooked filling in an airtight container for up to 3 days in the refrigerator, though it reheats best when fresh. The tortillas can be wrapped in plastic wrap and stored for 1 week at room temperature. For freezing, assemble the chimichangas, wrap individually in foil, and freeze for up to 3 months. To reheat, bake at 375°F (190°C) for 15 minutes until crispy again. The filling reheats beautifully, making these perfect for meal prep. Serve with cilantro-lime rice or black beans to complete the Tex-Mex experience.
Why You'll Love This Recipe
- I’ll be real: this recipe works everywhere. Stuff it in tortillas for a crispy chimichanga, serve it over rice for a hearty bowl, or even toss it into a breakfast scramble the next day. My kids ask for it at potlucks, and it’s the star of my game-day spread—no one cares if it’s fancy.
- Here’s what sold me: a pound of beef, a can of beans, and a can of sauce stretch into three meals without breaking the bank. The filling freezes like a dream, so I make a double batch and reheat it for lunch all week. Not the prettiest, but the taste makes up for it—every time.
Step-by-step instructions for beef and bean chimichanga
Master the art of crispy tortilla envelopes with this precise method for perfect texture every time.
Sauté the Aromatic Base
Heat the 0.5 cup vegetable oil in a large skillet over medium-high heat until shimmering. Add the 1 whole large yellow onion, diced into ¼-inch pieces, and cook for 5-6 minutes until softened and translucent. This foundational step develops flavor and prevents a raw onion taste in your chimichangas.
Add the 4 cloves garlic, minced, and cook for 30 seconds until fragrant—not browned. Remove the pan from heat and let the aromatics cool for 2 minutes. This brief resting period prevents the garlic from burning when you add the ground beef next.
Brown the Seasoned Ground Beef
Return the skillet to medium-high heat and add the 1.5 lb ground beef (80/20 lean-to-fat ratio), breaking it apart with a wooden spoon. Cook for 5-6 minutes until the beef loses its raw color and begins to brown. The high fat content is crucial here—it renders out, creating flavorful drippings that will crisp your tortillas later.
Stir in the 1 tbsp ground cumin, 1.5 tbsp chili powder, 1 tsp dried oregano, 1.5 tsp salt, and 0.5 tsp black pepper, mixing well to coat the beef evenly. Cook for another 2 minutes until the spices bloom and fill your kitchen with their aromatic warmth.
Combine and Simmer the Filling
Add the 15 oz drained and rinsed pinto beans and 0.5 cup tomato sauce to the skillet. Stir to combine, then reduce heat to medium-low and simmer uncovered for 8-10 minutes, stirring occasionally. The mixture should thicken slightly as excess moisture evaporates, creating a cohesive filling that holds its shape when wrapped.
Remove from heat and stir in the 1 tbsp lemon juice. This bright acidity cuts through the richness of the beef and beans, balancing the flavors. Let the filling cool for 5 minutes—this prevents the tortillas from becoming soggy when stuffed.
Assemble and Fry the Chimichangas
Lay out the 4 large flour tortillas on a clean work surface. Divide the cooled filling evenly among them, spreading it into a ¼-inch thick layer in the center of each tortilla. Fold the sides inward, then roll tightly from the bottom up, sealing the edges securely. The filling should be snug but not bursting—this ensures even cooking and crispiness.
Heat 2 inches of vegetable oil in a deep skillet to 350°F using a thermometer for precision. Fry the chimichangas in batches for 2-3 minutes per side until deep golden brown and crispy. The oil temperature is critical—too low, and they'll absorb oil; too high, and they'll burn before browning. Drain on a wire rack to maintain crispness.
Serve with Fresh Garnishes
Transfer the fried chimichangas to a serving platter and let rest for 2 minutes to set. Top each with 0.25 cup chopped fresh cilantro and a dollop of 0.25 cup sour cream. The contrast of cool sour cream against the crispy exterior and warm filling creates the perfect balance of textures and temperatures.
Serve immediately with additional sour cream, lime wedges, and sliced avocado if desired. The chimichangas should be crispy outside with a tender, flavorful interior—achieving that ideal texture requires precise timing and temperature control at every step.
Pro Tips For Making Beef And Bean Chimichanga
- CRISP THE ONIONS FIRST: Slice those yellow onions thin—like paper—and let them sit in cold water for 10 minutes before cooking. Drain and pat dry; they’ll caramelize faster and sweeter without burning. I used to skip this, and my chimichangas always tasted dull.
- BROWN THE BEEF LOW AND SLOW: Break the ground beef into small chunks, then cook it on medium-low heat until it’s fully browned—no rushing. High heat makes it tough, and you’ll end up with a greasy mess instead of flavor-packed crumbles. Trust me, the extra 5 minutes pays off.
- DRAIN AND RINSE THE BEANS: Open that can of pinto beans, drain and rinse them under cold water. The starchy liquid makes the filling soggy, and nobody wants a limp chimichanga. Pat them dry with a towel—this step alone keeps your tortillas from turning into boats.
- SAVE TIME WITH GARLIC PASTE: Skip mincing garlic and grab a jar of paste instead—it’s foolproof and cuts prep by half. Just add a teaspoon to the onion-beef mix while it’s cooking. Yes, it’s not fresh, but in a busy week, it’s the difference between dinner and takeout.
Flavor customization for this recipe
Spice Level Adjustments
For a milder version, reduce the chili powder to 1 tbsp and omit the cayenne if using. I often swap ½ tsp smoked paprika for the missing heat—it adds depth without spice.
For extra heat, add ½ tsp cayenne pepper or 1 tsp chipotle powder to the beef mixture. 🌶️
Cheesy Variations
Add 1 cup shredded Monterey Jack or pepper jack cheese to the filling before rolling—it melts beautifully during frying. For a gooey surprise, sprinkle ½ cup cotija cheese on top before serving. I also love adding ½ cup refried beans to the filling for extra creaminess and texture.
Protein Swaps
Swap the beef for 1 lb shredded chicken (cooked with the same spices) for a lighter option. For a vegetarian version, use 15 oz extra beans plus 1 block crumbled tempeh (marinated in the spice mix). The texture changes slightly, but the crispy tortilla remains the star. 💚
Smoky Flavor Boost
Add 1 tsp liquid smoke or ½ tsp smoked sea salt to the filling for a campfire-inspired depth. I also recommend toasting the cumin seeds for 30 seconds in a dry skillet before grinding—this intensifies their aroma.
For a smoky finish, brush the assembled chimichangas with ½ cup beer (like Corona or Modelo) before frying.
Sweet Heat Fusion
Stir in 2 tbsp brown sugar with the spices for a caramelized twist. Top with sliced pineapple and a drizzle of honey after frying for a Hawaiian-inspired fusion. This works surprisingly well with the savory beef and beans—trust me, it’s a crowd-pleaser! 🍍
Extra Crispy Techniques
For ultra-crispy chimichangas, brush the rolled tortillas with 1 egg wash before frying. I also recommend using corn tortillas (for a gluten-free option) and frying at 375°F for 1-2 minutes per side—they crisp differently but still deliver.
For baked versions, brush with 2 tbsp oil and bake at 400°F for 15-20 minutes until golden.
Nutrition facts
Frequently asked questions about beef and bean chimichangas
Can I bake chimichangas instead of frying?
Brush the assembled chimichangas with 2 tablespoons oil and bake at 400°F (200°C) for 15-20 minutes until golden and crispy. For extra crunch, place them on a wire rack over a baking sheet. The texture will be different but still delicious—just not as crispy as fried.
What's the best way to make the filling ahead of time?
Cook the filling as directed, then cool it completely and store in an airtight container for up to 3 days in the fridge. Reheat gently in a skillet before assembling. The tortillas can be wrapped and frozen raw for 1 month, or cooked and frozen for 3 months—just reheat in the oven at 375°F (190°C) for 15 minutes to restore crispness.
Why did my chimichangas turn out soggy?
Soggy chimichangas usually mean one of three things: overfilling, insufficient oil temperature (350°F/175°C is critical), or not draining properly after frying. Use ¼-inch thick filling max, maintain proper oil temp, and always drain on a wire rack—not paper towels. For baked versions, brush with oil and bake on a rack to prevent steam buildup.
Can I use corn tortillas instead of flour?
Yes, but expect a different texture! Corn tortillas are sturdier and crisp up differently when fried at 375°F (190°C) for 1-2 minutes per side. They won't be as pliable for rolling, so handle gently. For gluten-free diets, this works perfectly—just reduce frying time slightly to prevent burning.
What are the best sides to serve with these?
Classic pairings include cilantro-lime rice, refried beans, and guacamole for the full Tex-Mex experience. Add a simple Mexican street corn salad or black beans for extra heartiness. For a lighter option, serve with a crisp avocado salad or charred corn—the contrast of cool toppings balances the crispy, spicy filling beautifully.