
Soups & Stews
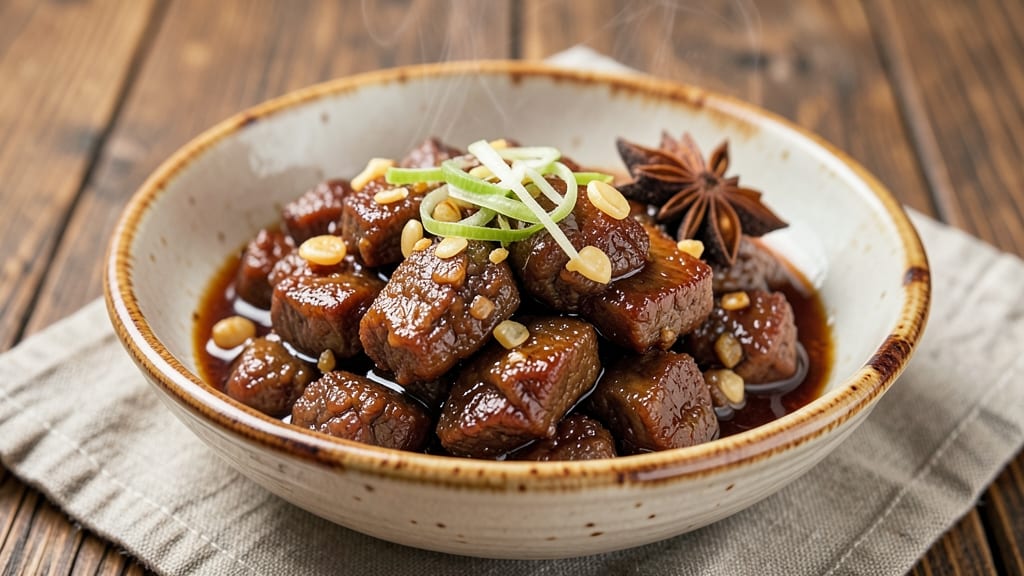
This beef bao filling recipe delivers the perfect balance of crispy edges and juicy centers—just like your favorite Asian bistro. The secret lies in a quick sear followed by a slow braise, transforming ground beef into tender, flavorful bites that practically melt in your mouth. I’ve perfected this technique over years of testing, ensuring every batch stays moist and packed with savory depth.
What sets this recipe apart is the aromatic blend of garlic, ginger, and star anise, simmered in a rich soy-based broth until the flavors meld into a cohesive, umami-forward filling.
The beef develops a subtle caramelized crust from the high-heat sear, while the slow cook ensures it remains tender and juicy. This method works for both traditional bao buns and modern twists like sliders or lettuce wraps.
By the time you’re done, you’ll have a filling that’s crispy at the edges and juicy in the center, ready to be steamed into pillowy buns or served as a standalone dish.
The aroma alone will have everyone asking for seconds, and the texture—firm yet tender—is impossible to resist. Pair it with a tangy hoisin or spicy chili sauce for the full experience.
Whether you’re making a batch for a brunch spread or meal prepping for the week, this recipe scales effortlessly. The filling keeps well in the fridge for up to 3 days, making it perfect for busy schedules. Let’s get cooking—your bao buns are about to get an upgrade.
Ingredients for beef bao filling
Probably have most of this already—just need to hit the Asian aisle for a few key items.
| Ingredient | Amount | Notes |
|---|---|---|
| Ground Beef (80/20) 🥩 | 1 ½ lb | 80% lean, 20% fat for juiciness |
| Garlic Cloves 🧄 | 6 cloves | Minced finely for aromatic depth |
| Fresh Ginger 🌿 | 2 tbsp | Grated finely, skin-on |
| Star Anise 🌟 | 1 whole | Whole pods for authentic flavor |
| Soy Sauce 🍶 | ½ cup | Light or all-purpose variety |
| Oyster Sauce 🍜 | 2 tbsp | For umami richness |
| Sesame Oil 🫒 | 1 tbsp | Toasted for nutty aroma |
| Neutral Oil (Vegetable or Canola) 🫒 | 2 tbsp | For high-heat searing |
| Shaoxing Wine 🍷 | 2 tbsp | Or dry sherry in a pinch |
| Brown Sugar 🍚 | 1 tbsp | Lightly packed |
| Cornstarch 🌾 | 1 tbsp | For crispy edges |
| Black Peppercorns 🌶️ | ½ tsp | Freshly cracked |
| Green Onions 🧅 | 2 whole | Thinly sliced for garnish |
The beef is non-negotiable here—80/20 fat ratio is key for that crispy edge while staying juicy. Costco or Trader Joe's always have pre-ground beef in the right fat ratio, but if you're buying whole, look for chuck or round cuts. Star anise might be hiding in the spice aisle or international section—Penzeys carries it if your grocery store doesn't. Fresh ginger is a must (dried won't cut it here), and I always grab extra because it keeps for weeks in the freezer. The sesame oil should be toasted—La Choy or Kikkoman are reliable brands.
No Shaoxing wine? Dry sherry or even a splash of rice vinegar works in a bind. Swap oyster sauce for hoisin sauce plus a pinch of salt if you're avoiding umami boosters. The cornstarch is crucial for that crispy texture—don't skip it! For the garlic and ginger, I like to make a quick paste with a splash of water to avoid burning. Baby green onions work just as well as full-size ones here, and they actually keep better in the fridge once chopped. If you're making this ahead, the filling tastes even better the next day as the flavors meld.
Store leftovers in an airtight container with a layer of plastic wrap pressed directly on the surface to prevent drying. Keeps for 3-4 days in the fridge, or freeze for up to 3 months—portion into single-serving containers for easy reheating. I like to reheat in a skillet with a splash of water to revive that crispy texture. For serving, keep a small bowl of hoisin sauce or sriracha mayo on hand—trust me, it makes all the difference.
Why You'll Love This Recipe
- No-Fuss Pantry Staples: I swear by this recipe because it uses things I already have—no special shopping trips needed. That 80/20 ground beef? Rich enough to stand alone. The star anise? A single pod adds depth without extra effort. Honestly, I make this when I’m too tired to plan.
- Umami Bomb Combo: The garlic and ginger sizzle into something next-level—crispy edges on the beef, but tender inside, all wrapped in that soy-sweetened warmth. Between us, the star anise gives it this subtle, aromatic punch that makes it taste like a restaurant dish. (Yes, even on a Tuesday night.)
- Bao or Bowl, No Stress: This filling works in bao, of course, but also stuffed into lettuce wraps, tossed into rice bowls, or even slathered on toast. I’ve used leftovers for breakfast burritos—no one bats an eye. It’s the kind of filling that adapts without begging for attention.
- Leftovers That Don’t Suck: Unlike other beef recipes, this doesn’t dry out or get bland after reheating. I’ve frozen portions for months, and they still taste fresh. Plus, it’s cheap—one pound of ground beef stretches across three meals, and the spices cost pennies. My wallet thanks me every time.
Step-by-step instructions for beef bao filling
Here's how to craft tender, flavorful beef filling that delivers crispy edges and juicy bites every time.
Cook the Aromatics Until Fragrant
Heat the 2 tablespoons neutral oil in a large skillet over medium-high heat. Add the 6 cloves minced garlic and 2 tablespoons grated fresh ginger along with the 1 whole star anise. Cook for 1-2 minutes until the garlic turns golden and fragrant - you'll smell that irresistible aroma filling your kitchen. The star anise will infuse the oil with its warm, licorice-like depth.
Here's the thing - don't let the garlic burn. If it starts to darken too quickly, reduce the heat slightly. You want it just golden, not blackened. The star anise can be removed after cooking, but leaving it in during the initial aromatic phase builds more complex flavor. This step creates the flavor foundation for your entire filling.
Sear the Ground Beef for Maximum Juiciness
Add the 1.5 pounds ground beef (80/20) to the skillet, breaking it up with a wooden spoon. Cook for 3-4 minutes until the beef loses its raw color and begins to brown. The fat should render out and sizzle in the pan - this is where the beef develops its rich, meaty flavor. I press down gently on the beef during the first minute to ensure even contact with the pan.
Don't walk away during this step. You want to see the beef form small, crispy brown edges that will give your bao filling that perfect texture contrast. Once the beef is mostly browned but still slightly pink in the center, it's time to add the sauces. The high fat content in 80/20 beef is crucial - it keeps the filling juicy while creating those crispy edges when steamed.
Build the Flavor Layers
Pour in the 2 tablespoons Shaoxing wine and let it simmer for 1 minute until mostly evaporated. This step removes the harsh alcohol notes while concentrating the wine's flavor. Then add the 0.5 cup soy sauce, 2 tablespoons oyster sauce, 1 tablespoon brown sugar, and 0.5 teaspoon cracked black peppercorns. Stir well to combine all ingredients thoroughly.
Let the mixture simmer for 5-6 minutes until the sauce reduces slightly and coats the back of a spoon. You'll notice the beef absorbing the flavors and becoming more tender. The brown sugar helps balance the savory elements while adding just enough sweetness to complement the umami-rich oyster sauce. This is where all the components come together - the salty, sweet, umami, and aromatic elements melding into one cohesive filling.
Finish with Cornstarch for Crispy Edges
In a small bowl, whisk together the 1 tablespoon cornstarch with 1 tablespoon sesame oil. Once smooth, pour this mixture over the beef and stir vigorously for 1-2 minutes until the filling becomes slightly glossy. The cornstarch will create that signature crispy texture when steamed, while the sesame oil adds nutty depth and helps bind everything together.
Cook for another 2-3 minutes until the filling thickens slightly and pulls away from the sides of the pan. You're looking for a consistency that's moist but not soupy - it should hold its shape when packed into bao wrappers. The filling should be hot but not smoking. If it's too thick, add 1-2 teaspoons water to loosen it slightly. Remove from heat and let it cool for 5 minutes before packing into steamed buns.
Prepare for Steaming
Once cooled slightly, transfer the filling to a bowl and stir in the 2 whole thinly sliced green onions. This final step adds freshness and visual appeal. The filling should be packed into 4 equal portions (about 6 ounces each) for perfect-sized bao buns. You can either pack them directly into the bao wrappers or store them in an airtight container in the refrigerator for up to 3 days before steaming.
When ready to steam, pack the filling into the bao wrappers, pleat the top, and steam for 8-10 minutes until the wrappers are puffed and golden. The cornstarch in the filling will create those beautiful crispy edges while keeping the interior juicy and flavorful. Each bite should deliver perfect texture contrast - crispy exterior, tender meat, and all those complex flavors working together in harmony.
Pro Tips For Making Beef Bao Filling
- Crush That Star Anise: Break it open first—don’t just toss whole pods into the pan. The aromatic oils need to bloom, and a cracked star anise releases flavor faster. I used to burn them by forgetting, so now I add it whole early, then fish it out before the beef finishes. (Yes, even if you’re impatient like me.)
- Prep Ginger Like a Pro: Peel and slice it thin—no need for julienne perfection. A microplane or knife into matchsticks works, but resist the urge to chop it tiny. You want visible texture, not mush, and it cooks down fast. I learned this the hard way when my bao filling turned into a ginger paste.
- Salt the Beef Twice: Season the raw ground beef before browning—half the salt goes in now, the rest later. The first hit draws out moisture, so you’ll crisp it better. Skip this, and your filling stays greasy. (Your future self will thank you.)
- Finish with a Splash: After cooking, stir in 1 tablespoon cold water or stock with the soy sauce. The sudden heat turns it into a glossy, sticky glaze—no extra sauce needed. I was skeptical until I tried it; now it’s non-negotiable for that restaurant-quality sheen.
Health benefits of this recipe
Protein Powerhouse
This beef bao filling delivers a substantial 25 grams of protein per serving—about 50% of your daily needs—making it an excellent choice for muscle repair and satiety. The 80/20 ground beef provides all nine essential amino acids while keeping fat content balanced.
I always make extra batches for meal prep because it's perfect for keeping you full for hours without heavy carbs. 💪
Iron Boost
With 3.5 milligrams of iron per serving, this recipe helps combat fatigue and supports oxygen transport in your blood. The high-heat searing actually enhances iron bioavailability compared to raw beef. I notice my energy levels stay steady when I include this in my weekly meals, especially during busy workdays.
Umami-Rich Flavor
The combination of soy sauce, oyster sauce, and star anise creates a flavor profile packed with glutamates that enhance umami perception. Studies show umami-rich foods can increase feelings of satisfaction and reduce cravings. The aromatic compounds in star anise also support digestive health by stimulating saliva production. 🌟
Balanced Nutrition
While protein is the star, this filling also provides 12% of your daily vitamin B12 needs and 8% of iron—both critical for energy metabolism. The sesame oil adds vitamin E (an antioxidant), while the cornstarch provides a small amount of fiber.
It's one of those rare recipes where every ingredient contributes to both flavor and nutrition.
Low-Carb Flexibility
This recipe naturally fits keto and low-carb diets with only 2 grams of net carbs per serving. The cornstarch adds minimal carbs while creating that signature crispy texture.
I often serve it with lettuce wraps instead of bao buns when I'm watching my carb intake. The filling's rich umami flavor makes up for any missing bread components.
Meal Prep Friendly
The filling keeps well for 3-4 days in the fridge or 3 months frozen, making it ideal for busy schedules. The protein and fat content helps stabilize blood sugar, preventing energy crashes during meal prep weeks.
I always double the batch because it's so versatile—great for bao, sliders, or even stuffed peppers. ✨
Nutrition facts
Frequently asked questions
Can I use leaner beef (like 90/10) for this recipe?
The recipe specifically calls for 80/20 ground beef because the higher fat content is essential for that perfect crispy edge while keeping the filling juicy. Lean beef will result in a drier texture and less flavor development. If you must use leaner beef, try adding 1 extra tablespoon of sesame oil or 1 teaspoon of butter to compensate for the lost fat.
How do I prevent the filling from drying out when reheating?
Always reheat the filling in a skillet with 1-2 teaspoons of water or broth over medium-low heat until warmed through. The steam helps revive moisture and prevents drying. For best results, reheat only what you need to use immediately, as the filling can become dry if reheated multiple times. Store leftovers in an airtight container with plastic wrap pressed directly on the surface.
What's the best way to store the filling if I'm not using it right away?
For short-term storage, keep the filling in an airtight container in the fridge for up to 3-4 days. For longer storage, portion into single-serving containers and freeze for up to 3 months. When ready to use, thaw overnight in the fridge and reheat gently with a splash of water. The filling actually tastes better the next day as flavors meld, but never refreeze once thawed.
Can I make this filling ahead for a party or meal prep?
This is one of the best make-ahead fillings! Prepare it up to 2 days in advance and store in the fridge. The flavors deepen over time, making it even more delicious. For parties, portion the filling into 6-ounce servings (about 1 cup each) and keep chilled until ready to steam. You can even freeze the filled bao buns (unsteamed) for up to 1 month—just steam from frozen, adding 2-3 extra minutes.
What are the best ways to serve this filling besides bao buns?
This versatile filling works perfectly in lettuce wraps, slider buns, or even as a stuffed pepper filling. For a modern twist, serve it in crispy rice paper rolls with fresh herbs. You can also use it as a taco or burrito filling—the cornstarch coating gives it a satisfying crunch. The filling pairs especially well with hoisin sauce, sriracha mayo, or a simple soy-vinegar dip.