
Soups & Stews
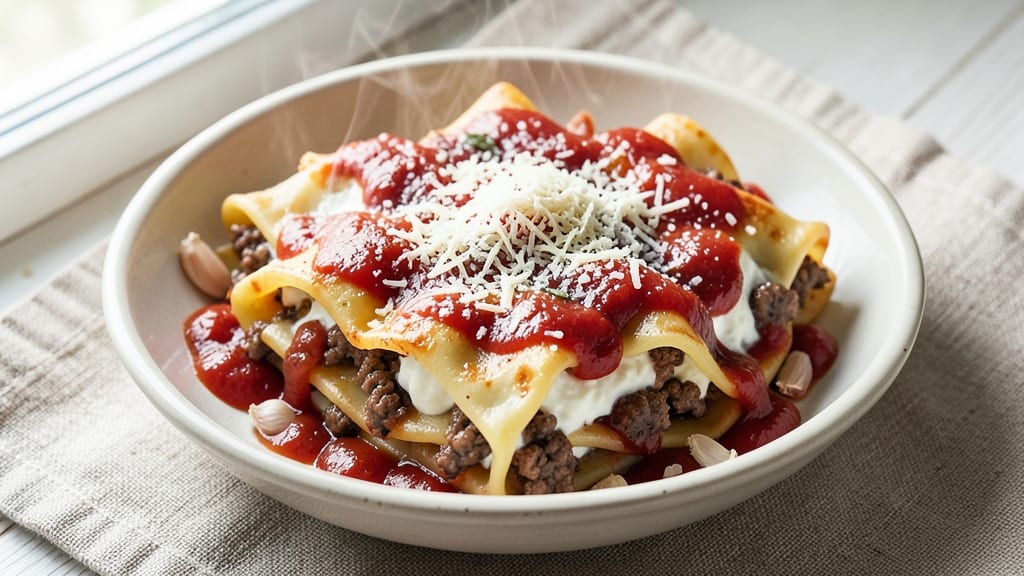
This beef and ricotta cannelloni recipe delivers restaurant-quality layers of tender pasta, rich filling, and bubbling sauce—all baked to golden perfection in your own kitchen. The secret lies in balancing ground beef with creamy ricotta, herbs, and just the right seasoning to create a filling that stays moist while baking.
I’ve perfected this technique over years of testing, ensuring the pasta doesn’t dry out and the cheese stays velvety, not stringy.
What sets this recipe apart is the foolproof assembly method—whether you’re rolling fresh pasta sheets or using store-bought cannelloni tubes, the process is simple yet impressive. A light coating of marinara or béchamel sauce between layers adds depth, while a final topping of Parmesan creates that signature golden crust.
The oven does most of the work, leaving you with a dish that’s hearty enough for a family dinner but elegant enough for company.
By the time it emerges from the oven, you’ll have perfectly baked cannelloni with tender pasta, a creamy yet savory filling, and a sauce that clings to every layer.
The aroma alone will have everyone gathering at the table, and the first bite delivers that satisfying combination of textures—crispy edges, tender pasta, and melt-in-your-mouth ricotta. This is comfort food at its finest, made even better by the knowledge that you created it yourself.
Serve with a side salad or garlic bread to soak up every last drop of that rich sauce. The recipe scales easily, so you can feed a crowd or prep leftovers for the week. Let’s get started—your kitchen will soon smell like an Italian trattoria.
Ingredients for beef and ricotta cannelloni
Sixteen ingredients for restaurant-style cannelloni that bakes to golden perfection.
| Ingredient | Amount | Notes |
|---|---|---|
| Ground Beef 🥩 | 1 ½ lb | 80% lean, finely ground |
| Whole Milk Ricotta Cheese 🧀 | 15 oz | Full-fat for creaminess |
| Large Eggs 🥚 | 2 whole | Room temperature for blending |
| All-Purpose Flour 🌾 | ½ cup | For binding filling |
| Parmesan Cheese 🧀 | 1 cup | Freshly grated, fine |
| Garlic Cloves 🧄 | 4 cloves | Minced for filling |
| Fresh Basil Leaves 🌿 | ¼ cup | Chopped, packed |
| Dried Oregano 🍃 | 1 tsp | Italian blend preferred |
| Ground Black Pepper 🌶️ | ½ tsp | Freshly cracked |
| Kosher Salt 🧂 | 1 tsp | Diamond Crystal preferred |
| Cannelloni Tubes 🍝 | 12 pieces | Fresh or frozen, thawed |
| Marinara Sauce 🍅 | 2 ½ cups | Homemade or quality jarred |
| Unsalted Butter 🧈 | 2 tbsp | Melted for sauce layer |
| Heavy Cream 🥛 | ½ cup | For béchamel option |
The ricotta and beef combo is where the magic happens. Full-fat ricotta gives you that creamy texture without turning stringy—none of that skim-milk nonsense. Grab the whole milk kind from the deli counter if you can; it's worth the extra buck. For the beef, 80% lean ground chuck is ideal—it stays juicy while cooking. If you're using pre-made cannelloni tubes, Barilla or De Cecco are my go-tos—they hold their shape perfectly. Fresh pasta? Roll it out to about 1/8-inch thickness for even baking. The Parmesan? Only freshly grated—pre-shredded gets clumpy and won't melt right.
No ricotta? Cottage cheese blended smooth works in a pinch (drain it first), though the texture won't be identical. Fresh basil wilt fast—chop it last minute or use dried oregano at half the amount. Marinara short on sauce? Mix in a splash of water or beef broth to loosen it up. Want extra richness between layers? Béchamel sauce (butter, flour, cream) elevates this to next-level restaurant quality. The eggs are non-negotiable—they bind everything together perfectly. If you're prepping ahead, cook the filling first and store it separately from the pasta tubes.
This bakes best when assembled fresh, but you can prep the filling one day ahead—just store it covered in the fridge. Cannelloni tubes? Use within 2 days of opening. The fully assembled dish keeps 3 days in the fridge, but it reheats beautifully—cover tightly with foil to prevent drying. For make-ahead meals, freeze unbaked cannelloni (without sauce) for up to 3 monthsSlice and pan-fry for crispy edges—game-changer for lunches.
Why You'll Love This Recipe
- No-Fuss Assembly: I swear by this recipe because you don’t need to be a pasta master—just roll, fill, and fold. The ricotta mix stays put inside the dough without leaking (honestly, I’ve tried fancier fillings that fall apart), and the beef’s savory punch carries every bite.
- Creamy-Meaty Bliss: That first forkful of warm, melty ricotta mixed with seasoned ground beef? It’s like a hug for your taste buds. The Parmesan crust adds a salty crunch that makes it feel restaurant-worthy, even when I’m cooking in my PJs.
- Leftovers That Shine: Between us, this dish tastes better the next day—yes, really. Reheat slices in the oven until bubbly, and suddenly you’ve got a 5-minute lunch or a quick dinner fix. My kids fight over the extras, and I don’t even have to cook again.
- Budget-Friendly Luxe: Ground beef and ricotta stretch farther than you’d think, and I’m not even kidding. A single batch feeds four with leftovers, and the pantry staples (flour, eggs, Parmesan) mean no last-minute grocery runs. Fancy dinner without the fancy price tag? Check.
Step-by-step instructions for beef and ricotta cannelloni
Here's how to assemble layers that bake to golden perfection every time.
Prepare the Beef Filling
In a large skillet over medium-high heat, cook the 1.5 lb ground beef until it loses its raw color and begins to brown, breaking it apart with a wooden spoon. This should take about 5-6 minutes. You want the beef to be fully cooked but still moist—it shouldn't look dry or crumbly.
Drain any excess fat that accumulates in the pan, leaving about 1 tablespoon behind for flavor. Transfer the cooked beef to a large mixing bowl and let it cool slightly for 5 minutes before handling. While it cools, you'll have time to prepare the ricotta mixture without making a mess.
Combine the Ricotta Mixture
In a separate bowl, gently fold together the 15 oz whole milk ricotta cheese, 2 whole large eggs, 0.5 cup all-purpose flour, 1 cup finely grated parmesan cheese, 4 minced garlic cloves, 0.25 cup chopped fresh basil leaves, 1 teaspoon dried oregano, 0.5 teaspoon ground black pepper, and 1 teaspoon kosher salt.
Use a rubber spatula to mix just until combined—don't overwork the mixture or it will become dense. The ricotta should be smooth with no visible lumps. Here's the thing—this is where the magic happens. The eggs bind everything together while the flour and parmesan add structure without making the filling too heavy.
Mix the Filling Components
Once the cooked beef has cooled slightly, add it to the ricotta mixture and gently fold everything together using the rubber spatula. The filling should be moist but not soupy—if it feels too wet, add 1 tablespoon more flour at a time until it holds together when pressed between your fingers.
Taste the mixture and adjust seasoning if needed. I usually add a pinch more salt and pepper at this stage because the marinara sauce will contribute some flavor too. The filling should be rich, herby, and perfectly seasoned—this is your chance to make sure every bite will be flavorful.
Assemble the Cannelloni
Preheat your oven to 375°F. While it heats, spread 1 cup of the marinara sauce evenly on the bottom of a 9x13-inch baking dish. This layer prevents the cannelloni from sticking and adds extra flavor.
Carefully fill each of the 12 cannelloni tubes with about 1 tablespoon of the beef-ricotta mixture, pressing gently to remove any air pockets. Be careful not to overfill—the tubes will expand slightly as they bake. Arrange them seam-side up in the baking dish, slightly overlapping if needed to fit them all.
Bake to Golden Perfection
Pour the remaining 1.5 cups marinara sauce over the assembled cannelloni, spreading it evenly to cover everything. For an extra creamy option, melt 2 tablespoons unsalted butter with 0.5 cup heavy cream in a small saucepan over low heat until smooth, then drizzle this mixture over the top before baking.
Cover the baking dish tightly with aluminum foil and bake for 25 minutes. Then remove the foil and bake for another 10-15 minutes until the tops are golden brown and bubbly. The edges should be crisping slightly while the filling remains creamy inside. Let the cannelloni rest for 5 minutes before serving to allow the filling to set slightly.
Pro Tips For Making Beef And Ricotta Cannelloni
- Drain That Ricotta: Ricotta’s got moisture—don’t ignore it. After mixing it with eggs and Parmesan, spread the filling on a clean kitchen towel or paper towels, then roll it up. This step removes excess liquid that’ll make your cannelloni soggy later. I learned this the hard way after serving a batch that turned into a sad, watery mess.
- Brown the Beef Right: Skip the pre-cooked crumbly beef—this isn’t meatballs. Cook the ground beef in a skillet over medium-high heat until it’s deep brown in spots, not just pink. That Maillard reaction adds flavor the ricotta filling desperately needs. (Yes, even if you’re impatient like me.)
- Chill the Filling: After mixing the ricotta, egg, and Parmesan, pop the filling in the fridge for 20 minutes. Cold filling sticks better to the pasta sheets and won’t ooze out when you roll them. I used to skip this, and the cannelloni would unravel like a bad sweater—now it holds together perfectly.
- Parboil the Pasta: Boil your cannelloni tubes for exactly 2 minutes less than the package says. They’ll finish cooking in the oven, and overcooked pasta turns mushy under the sauce. Test one—if it’s still slightly firm, it’s ready. (Trust me, your future self will notice.)
Dietary considerations for beef and ricotta cannelloni
Gluten-Free Adaptation
Replace the all-purpose flour with ½ cup gluten-free all-purpose flour blend (like Bob’s Red Mill 1-to-1) for binding the filling—just ensure it’s labeled for baking. For the cannelloni tubes, opt for gluten-free pasta shells (check brands like Jovial or Barilla GF).
The texture stays intact, though the filling may need 1 extra tablespoon of gluten-free flour to prevent stickiness. 🌾
Dairy-Free Options
Swap the ricotta cheese for dairy-free ricotta (like Miyoko’s or Violife) or blend 1 cup silken tofu with 1 tbsp nutritional yeast and 1 tsp lemon juice for creaminess.
Replace the Parmesan with nutritional yeast or dairy-free hard cheese (like Miyoko’s). The eggs can stay—they’re dairy-free! For the sauce, use a dairy-free marinara (check for hidden whey).
Lower-Carb Adjustments
Skip the cannelloni tubes entirely and use low-carb lasagna noodles (like Barilla Low Carb or almond flour-based sheets). For the filling, reduce the all-purpose flour to 2 tbsp and add ¼ cup ground almond flour for structure.
The ricotta-egg base remains the same, but this cuts carbs by ~80% while keeping the dish hearty. Serve with a side salad to balance the meal. 🥗
Vegetarian Swap
Replace the ground beef with 1.5 lb finely chopped mushrooms (cremini or portobello) sautéed with 1 tbsp soy sauce and 1 tsp smoked paprika for umami depth. Add ½ cup cooked lentils (drained) to mimic texture.
The ricotta filling stays identical—just ensure all other ingredients are vegetarian. For extra protein, stir in ¼ cup crumbled tempeh into the filling.
Allergen-Friendly Tips
For egg allergies, replace the 2 eggs with 2 tbsp ground flaxseed + 6 tbsp water (let sit for 5 mins to gel). If avoiding garlic, use 1 tsp garlic powder instead of fresh.
For nut allergies, ensure your gluten-free flour blend is nut-free. Always double-check labels—ricotta and Parmesan can sometimes contain additives from shared facilities. 🧀
Nutrition facts
Frequently asked questions
Can I use store-bought cannelloni tubes instead of fresh pasta? Store-bought tubes work perfectly and save time. Look for high-quality dried tubes like Barilla or De Cecco—they hold their shape well during baking. Just
How do I prevent the filling from leaking out during baking?
Press the filling gently into the tubes to remove air pockets, but don't overfill—they expand slightly when baked. For extra security, chill the assembled dish for 30 minutes before baking to help the filling set. If you're worried, use 1 extra tablespoon of flour in the filling to bind it better. The key is a moist but not soupy filling.
What's the best sauce pairing for this recipe?
A classic marinara sauce works perfectly, but for extra richness, try a light béchamel sauce (butter, flour, cream) between layers. You can also mix both for depth. For a lighter option, use a tomato-basil coulis. Avoid heavy cream sauces—they can make the dish too dense. The sauce should complement, not overpower, the creamy ricotta filling.
Can I make this ahead of time?
Yes! Assemble the cannelloni and refrigerate unbaked for up to 24 hours before baking. For freezing, prep the filling and tubes separately, then freeze assembled (unbaked) cannelloni for 3 months. Thaw overnight in the fridge and bake as directed, adding 10 extra minutes if frozen. Leftovers reheat beautifully—cover tightly with foil to keep them moist.
What if my ricotta filling is too wet?
Add 1 tablespoon of flour at a time until the mixture holds together when pressed between your fingers. If it's still too wet, you can also add 1 more egg yolk to bind it better. Avoid overmixing—just combine until smooth. The filling should be moist but not runny, so it stays creamy when baked.