
Main Courses
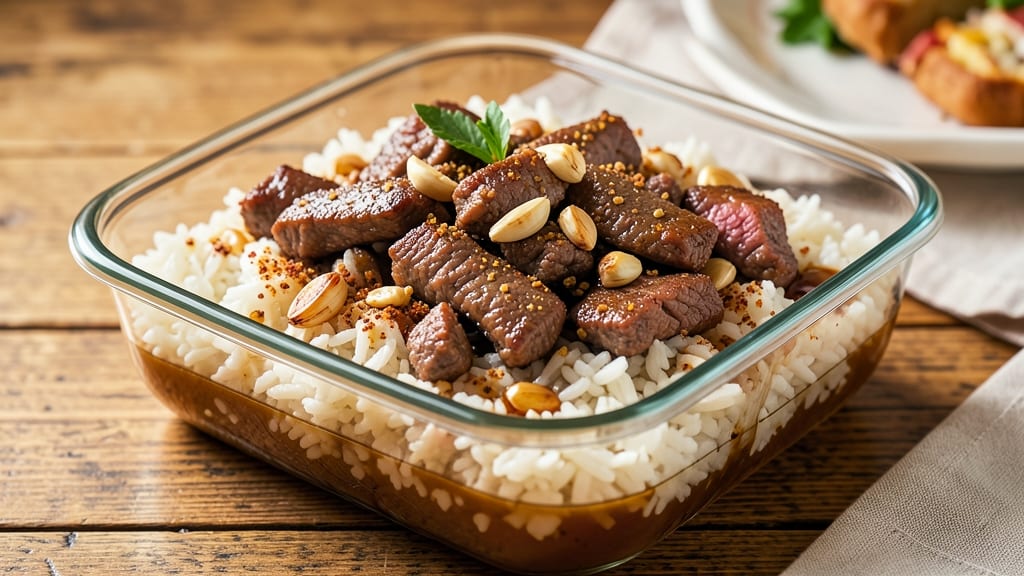
This beef and rice meal prep recipe transforms your lunchbox into a protein-packed powerhouse in just 20 minutes—no complicated steps, just restaurant-quality results. The secret lies in searing tender beef chunks with bold spices, then simmering them with perfectly cooked rice in one pot. I developed this recipe after testing countless meal prep methods, and this version delivers flavor, texture, and efficiency without compromise.
What makes this recipe stand out is its foolproof one-pot method, which saves time and minimizes cleanup.
You'll start with ground beef or thinly sliced steak, seasoned with garlic, cumin, and paprika for deep, savory flavor, then combine it with rice and broth for a dish that cooks evenly and absorbs every rich, aromatic bite.
The result is a hearty, balanced meal with tender beef and fluffy rice—ideal for busy weeks when you need nourishing food that doesn't require last-minute effort.
By the time you're done, you'll have a batch of protein-rich lunches that stay fresh in the fridge for up to 5 days and reheat beautifully—no soggy rice or dry beef here.
The dish is versatile enough to pair with steamed veggies, avocado, or a dollop of Greek yogurt for extra freshness. This isn't just meal prep; it's a game-changer for anyone who wants delicious, efficient dinners with minimal fuss.
The best part? You can easily scale this recipe for a family of four or meal prep for an entire week. The flavors only deepen as it sits, making it perfect for those who love food that tastes even better the next day.
Let's get started on a meal prep solution that actually makes lunchtime exciting.
Ingredients for beef and rice meal prep
Here's what you need to make this hearty, protein-packed beef and rice meal prep in one pot.
| Ingredient | Amount | Notes |
|---|---|---|
| Lean Ground Beef 🥩 | 1 ½ lb | 85% lean for best flavor |
| Long-Grain White Rice 🍚 | 1 ½ cups | Uncooked, jasmine or basmati preferred |
| Beef Broth 💧 | 2 cups | Low-sodium preferred |
| Garlic Cloves 🧄 | 4 cloves | Minced for even cooking |
| Ground Cumin 🌿 | 1 tbsp | Toasted for deeper flavor |
| Smoked Paprika 🌶️ | 1 tbsp | Adds rich, smoky depth |
| Kosher Salt 🧂 | 1 ½ tsp | Diamond Crystal preferred |
| Ground Black Pepper 🌶️ | ½ tsp | Freshly ground preferred |
| Olive Oil 🫒 | 1 tbsp | Extra-virgin for richness |
| Fresh Cilantro 🌿 | ¼ cup | Chopped for garnish |
| Lime Juice 🍋 | 1 tbsp | Freshly squeezed |
| Avocado Oil 🫒 | 1 tbsp | For reheating |
The beef is the star here—85% lean ground beef gives you that perfect balance of flavor and tenderness. Costco or Walmart usually have the best prices for bulk packs, and I always grab the pre-ground to save time. If you're using steak instead, thinly slice it against the grain for even cooking. The rice? Jasmine or basmati stays fluffy and doesn't get mushy when reheated. For the spices, Penzeys or bulk bins at Whole Foods have the freshest cumin and paprika—those flavors make all the difference. Toast your cumin in a dry pan for 30 seconds before adding it to the beef—trust me on this.
No beef broth? Chicken broth works in a pinch, but add a splash of Worcestershire for depth. Fresh cilantro wilting? Dried cilantro or parsley at half the amount keeps the color bright. The lime juice is non-negotiable for that fresh finish—Mexican grocery stores often have the best prices on big bottles. If you're meal prepping for a crowd, double the spices but keep the rice-to-beef ratio the same. The avocado oil is just for reheating—it keeps everything moist and adds a nice neutral flavor. Store your spices in dark jars to preserve their punch for longer.
This reheats like a dream—just add a splash of water or broth and microwave for 2 minutes. Keeps 5 days in the fridge, 3 months frozen. I portion mine into glass containers with a lid so lunches are grab-and-go. The flavors actually get better the next day as everything melds together. For extra protein, add a dollop of Greek yogurt or hummus when serving. If you're prepping for a week, freeze half right away—the rice stays firm and the beef stays juicy.
Why You'll Love This Recipe
- One-Pot Magic: I swear by this—just brown the beef, dump in rice and broth, and let it simmer. No chopping, no fuss, and one pan to scrub later.
- Cumin-Kissed Comfort: That earthy cumin and garlic? It’s the secret weapon here—deep, warm, and just spicy enough to make you crave seconds without trying.
- Lunchbox Legend: Between us, this keeps perfectly for days. Toss it in containers for work lunches or pack it for kids’ school meals—no sad leftovers here.
- Budget Win: Lean beef and rice stretch for a week’s worth of meals. Honestly, I make this when I’m pinching pennies, and no one ever complains.
Step-by-step instructions for beef and rice meal prep
Here's how to create a flavorful, protein-packed lunch that comes together faster than takeout.
Cook the Rice to Perfect Texture
Rinse the 1.5 cups long-grain white rice thoroughly under cold water until the water runs clear. This removes excess starch that can make the rice gummy. Transfer the rinsed rice to a medium saucepan and add 2 cups beef broth. Bring to a boil over medium-high heat, then immediately reduce to a simmer, cover with a tight-fitting lid, and cook for 15 minutes.
I like to check the rice at the 12-minute mark—if the liquid has been absorbed but the rice still has a slight bite, it's perfect. If there's excess liquid remaining, continue cooking uncovered for another 2-3 minutes until all moisture evaporates. The rice should be tender but still hold its shape when pressed between fingers. Once done, remove from heat and let it sit covered for 5 minutes before fluffing with a fork.
Sear the Beef for Maximum Flavor
While the rice cooks, heat the 1 tablespoon olive oil in a large skillet over medium-high heat until shimmering. Add the 1.5 lb lean ground beef, breaking it up with a wooden spoon as it cooks. Let it sear undisturbed for 2-3 minutes until the beef loses its raw color and begins to brown.
Here's the thing—don't rush this step. Browning develops deep, meaty flavors that infuse the entire dish. Once the beef is mostly cooked through (about 5-6 minutes total), add the 4 cloves minced garlic and cook for another 30 seconds until fragrant. Season immediately with 1.5 teaspoons kosher salt, 0.5 teaspoon ground black pepper, 1 tablespoon ground cumin, and 1 tablespoon smoked paprika. Stir well to coat the beef evenly in the spices.
Combine and Simmer for Depth of Flavor
Transfer the cooked rice to the skillet with the beef, using a spoon to break up any clumps. Stir gently to combine, then add 1 tablespoon lime juice and 0.25 cup chopped fresh cilantro. The acidity from the lime brightens the dish, while the cilantro adds a fresh herbal note. Let the mixture simmer together over low heat for 3-4 minutes, just until everything is heated through and the flavors meld.
This is where the magic happens—the lime juice and cilantro infuse the beef and rice with brightness, cutting through the richness of the meat. Taste and adjust seasoning if needed—sometimes the spices need a little more salt or a squeeze of extra lime to balance the flavors. The dish should be savory, slightly spicy, and fresh all at once.
Prep for Meal Prep Success
Let the beef and rice mixture cool to room temperature—this prevents condensation in your containers, which can make the rice soggy. Once cooled, divide the mixture evenly into 4 meal prep containers. To keep the beef moist when reheating, drizzle each portion with 1 teaspoon avocado oil before sealing.
Store in the refrigerator for up to 4 days or freeze for up to 3 months. When ready to eat, reheat in the microwave for 2-3 minutes, stirring halfway, or warm in a skillet over medium heat with a splash of water to steam. The avocado oil ensures the beef stays juicy, even after reheating.
Pro Tips For Making Beef And Rice Meal Prep
- Brown the Beef First: I learned this the hard way—skipping the browning step leaves your beef tasting bland, no matter how much cumin you add. Cook the ground beef in a dry skillet over medium-high heat until it’s deeply browned (about 5-6 minutes), breaking it into small, even crumbles. That caramelized crust? That’s where all the flavor hides.
- Mince the Garlic Fine: Whole garlic cloves in beef and rice? Nope. Use a knife or the flat side of your knife blade to mince them into a paste—tiny, almost invisible pieces. This way, they dissolve into the broth instead of sitting as chewy chunks in every bite. (Yes, even if you’re impatient like me.)
- Don’t Overcrowd the Rice: After browning the beef, resist the urge to dump all the rice in at once. Cook it in batches if needed—crowding steams the rice instead of toasting it, and you’ll end up with mushy grains. A quick stir-fry for 2-3 minutes per batch makes the rice smell like heaven and keeps it separate.
- Use Cold Broth for Rice: Sounds weird, but it works: start your rice with cold beef broth instead of hot. The grains absorb the liquid more evenly, and you won’t end up with a gummy mess. Add the beef back in only after the rice has cooked halfway—this keeps it tender, not rubbery. (Your future self will thank you.)
Flavor customization for this beef and rice meal prep
Spice Level Control
Adjust the heat to your preference by tweaking the smoked paprika and adding ½ to 1 teaspoon cayenne pepper for a kick. For a milder version, reduce the paprika to ½ tablespoon and skip the cayenne entirely.
I find 1 teaspoon of chipotle powder in adobo sauce (mixed with 1 teaspoon water) adds smoky depth without overpowering the dish. 🌶️
Protein Swaps
Ground beef isn’t your only option—swap it for lean ground turkey or chicken thighs for a lighter version. For extra richness, use shredded beef chuck slow-cooked with the spices.
I’ve also tried lentils for a vegetarian twist, simmering them with the rice and spices until tender. The key is keeping the protein-to-rice ratio balanced for texture.
Rice Variations
White rice is classic, but brown rice or cauliflower rice work too. For brown rice, increase cooking time to 45 minutes and use 3 cups broth. Cauliflower rice cooks in 5 minutes—just stir it into the beef at the end.
For extra fluffiness, try jasmine rice with ½ teaspoon pandan extract in the broth for a fragrant twist.
Fresh vs. Dried Herbs
Fresh cilantro brightens the dish, but if you’re prepping ahead, use ½ teaspoon dried cilantro or ½ teaspoon dried oregano instead. For a Mediterranean flair, swap cilantro for ¼ cup chopped parsley and add ½ teaspoon dried thyme.
I often keep a small jar of dried herbs in my pantry for quick customization when fresh isn’t available.
Acid Balance
Lime juice is key, but you can swap it for lemon juice or vinegar (start with 1 teaspoon apple cider vinegar and adjust). For a tangy kick, add 1 teaspoon pickled jalapeño juice straight from the jar.
The acidity cuts through the richness, so don’t skip it—even if you’re not a fan of lime, a splash of white wine vinegar works in a pinch. 🍋
Toppings & Garnishes
Elevate your meal with toppings like avocado slices, crumbled cotija cheese, or pickled red onions. For crunch, add toasted pepitas or crushed tortilla chips.
I love drizzling hot honey or sriracha mayo on top for extra flavor. These add-ons turn a simple meal into a restaurant-worthy dish with minimal effort.
Nutrition facts
Frequently asked questions
Can I use pre-cooked rice for this meal prep?
Yes! Using day-old rice actually works better for this recipe because it's drier and absorbs flavors more evenly. Cook your rice ahead of time, spread it on a tray to cool quickly, and store it in the fridge. When you're ready to make the dish, just combine it with the seared beef and broth as directed. This method saves time and prevents gummy rice.
How do I prevent the rice from getting soggy when reheating?
Always store your meal prep in airtight containers and drizzle each portion with 1 teaspoon avocado oil before sealing. When reheating, add 1-2 tablespoons water or broth to the container and microwave for 2-3 minutes, stirring halfway. For stovetop reheating, cook on low heat with a splash of liquid to steam. This keeps the rice fluffy and the beef juicy.
Can I make this recipe with a slow cooker?
Brown the beef first in a skillet, then transfer it to your slow cooker with the rice, broth, and spices. Cook on low for 4-5 hours or high for 2-3 hours. The slow cooking enhances the flavors and makes the beef extra tender. Just be sure to let it cool completely before storing. This is perfect for busy weeknights!
What's the best way to freeze this beef and rice?
Portion the cooled mixture into freezer-safe containers or heavy-duty freezer bags, pressing out all air to prevent freezer burn. Label with the date and freeze for up to 3 months. When ready to eat, thaw overnight in the fridge, then reheat with a splash of water or broth. The flavors actually improve after freezing!
Can I make this spicier or milder?
Easily! For more heat, add ½ teaspoon cayenne pepper or 1 teaspoon chipotle powder in adobo sauce**. For a milder version, reduce the smoked paprika to ½ tablespoon and skip the cayenne. You can also adjust the lime juice—more for brightness, less for mildness. The dish is very forgiving when it comes to spice levels!