
Soups & Stews
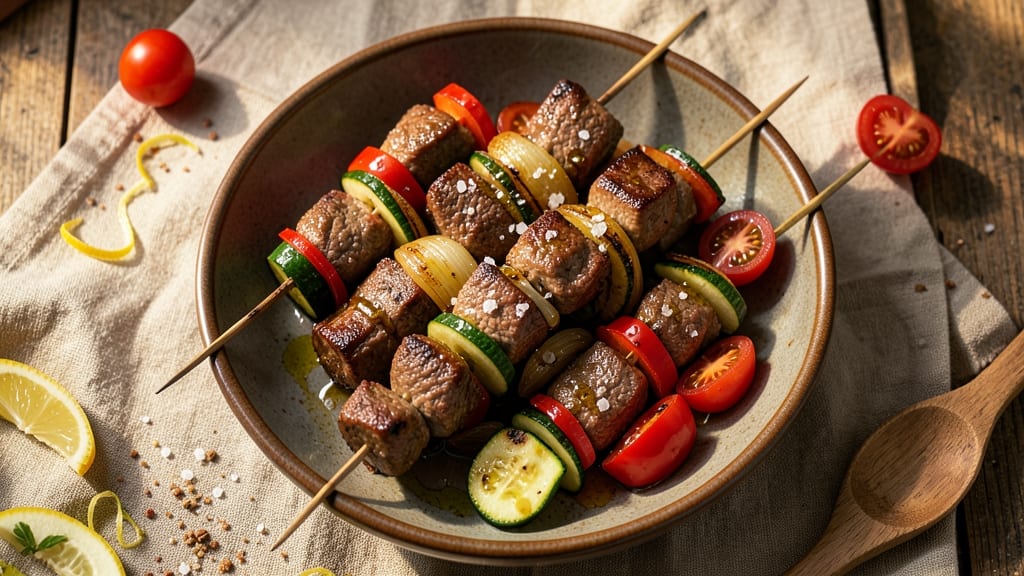
This beef and vegetable kabob recipe delivers restaurant-quality charred flavor with minimal effort—perfect for weeknight dinners or summer gatherings. The secret lies in a simple marinade that tenderizes the beef while infusing bold flavors, paired with vegetables that caramelize beautifully on the grill. I've perfected this method over countless backyard cookouts, ensuring juicy meat and perfectly crisp edges every time.
What sets this recipe apart is the balance of technique and simplicity. You'll marinate the beef and vegetables for just 30 minutes (no overnight fuss), then thread them onto skewers with alternating ingredients for even cooking.
The result? Tender beef with a smoky crust, paired with charred vegetables that burst with flavor. This method works equally well on a gas grill, charcoal grill, or even in a cast-iron skillet for indoor cooking.
By the time you're done, you'll have a dish that's as impressive as it is delicious—golden-brown skewers piled high with juicy beef and vibrant vegetables, drizzled with a tangy yogurt sauce for extra brightness.
The aroma alone will have everyone gathering around the grill, and the first bite delivers that perfect combination of smoky, charred, and tender textures.
Serve with crusty bread to soak up the juices or pair with a crisp white wine for a complete meal. This recipe scales effortlessly for any crowd size, making it ideal for everything from intimate dinners to lively backyard parties. Let's get started!
Ingredients for beef and vegetable kabob
Restaurant-quality kabobs start with these carefully chosen ingredients designed for bold flavor and perfect grill char.
| Ingredient | Amount | Notes |
|---|---|---|
| Beef Chuck Roast 🥩 | 1 ½ lb | Trimmed of visible fat, cut into 1-inch cubes |
| Red Bell Peppers 🍆 | 2 whole | Cut into 1-inch chunks, core and seeds removed |
| Yellow Onions 🧅 | 1 whole | Cut into 1-inch chunks, peeled |
| Zucchini 🥒 | 2 medium | Cut into 1-inch slices, trimmed |
| Cherry Tomatoes 🍅 | 1 pint | Left whole for skewering |
| Extra-Virgin Olive Oil 🫒 | ¼ cup | High-quality, fruity variety |
| Lemon Juice 🍋 | 2 tbsp | Freshly squeezed, strained |
| Garlic Cloves 🧄 | 4 cloves | Minced finely for marinade |
| Dried Oregano 🌿 | 1 tbsp | Crumbled, not powdered |
| Ground Black Pepper 🌶️ | 1 tsp | Freshly cracked |
| Diamond Crystal Kosher Salt 🧂 | 1 ½ tsp | For seasoning and marinade |
| Wooden Skewers 🪵 | 12 whole | Soaked in water for 30 minutes |
| Plain Greek Yogurt 🥛 | ½ cup | Full-fat for tangy sauce |
| Fresh Dill 🌿 | ¼ cup | Chopped finely for sauce garnish |
The beef selection is critical here—chuck roast delivers the ideal balance of tenderness and flavor when marinated and grilled. Look for cuts with good marbling at your local butcher or Whole Foods meat department, where the staff can help identify quality pieces. The vegetables should be firm and vibrant: red bell peppers with glossy skins, zucchini that's heavy for its size, and cherry tomatoes that pop when squeezed. For the olive oil, California Avocado Ranch or Colavita brands provide excellent flavor without overpowering the marinade. Fresh garlic and lemon juice are non-negotiable—bottled versions lack the bright acidity needed to tenderize the beef properly.
No red bell peppers? Yellow or orange bell peppers work equally well, though they'll have slightly different sweetness profiles. Running out of zucchini? Yellow squash is a perfect substitute, though it has a slightly different texture when charred. The marinade can be adjusted for dietary needs: substitute balsamic vinegar for lemon juice if you prefer, though the acidity will differ. For the yogurt sauce, Fage 5% plain Greek yogurt provides the perfect tang, but any full-fat variety will work. If you're avoiding dairy, coconut yogurt makes an excellent plant-based alternative. The skewers must be soaked—at least 30 minutes in water prevents them from burning on the grill while holding the ingredients securely.
Marinated ingredients keep best in airtight containers in the refrigerator for up to 24 hours, though they're best used within 8 hours for optimal texture. The yogurt sauce should be made fresh and stored separately—it keeps for 3 days in the fridge but develops a slightly grainier texture. For meal prep, assemble the skewers and refrigerate uncooked for up to 4 hours before grilling. The cooked kabobs reheat beautifully in a 350°F oven for 10 minutes, though they're best enjoyed fresh off the grill for that perfect charred crust.
Why You'll Love This Recipe
- Chop-Free Night: I swear by the "cut what you can" rule here—bell peppers and onions slice in seconds, zucchini chunks don’t need precision, and cherry tomatoes just pop right on. The beef? One quick cube, no fancy trimming. Honestly, I’ve made this while scrolling through my phone.
- Smoky-Sweet Magic: That beef chuck roast, marinated in garlic and olive oil, gets just tender on the grill (or skillet) with a caramelized crust. The bell peppers add natural sweetness, while the onions release into sticky, savory pools—every bite is a balance of rich and bright. (Yes, even on a Tuesday night.)
- Leftover Hero: Double the recipe and you’ve got dinner for three days. The beef stays juicy when reheated, and the veggies hold up beautifully—toss them in a salad, wrap them in a tortilla, or just eat them cold. My lunchbox never looked this good before.
- Budget Meal, Big Payoff: Chuck roast is the unsung hero of affordable protein, and these veggies stretch a long way. I’ve fed six people for under $15 with this—plus, the leftovers make me look like a meal-prep genius. (Between us, it’s my secret weapon for grocery night.)
Step-by-step instructions for skewered beef and vegetable kabobs
Transform simple ingredients into restaurant-worthy kabobs with perfectly charred beef and tender vegetables.
Marinate the Beef for Maximum Flavor
In a large bowl, combine the 1.5 lb beef chuck roast (cut into 1-inch cubes), 0.25 cup extra-virgin olive oil, 2 tbsp lemon juice, 4 cloves minced garlic, 1 tbsp dried oregano, 1 tsp ground black pepper, and 1.5 tsp diamond crystal kosher salt. Use your hands to massage the marinade into the beef, ensuring every cube is evenly coated. This step infuses the meat with bright, herby flavors while tenderizing it.
Transfer the beef to a resealable plastic bag, seal tightly, and refrigerate for at least 4 hours—overnight is ideal. The acidity from the lemon juice and the oregano will break down the tough fibers, resulting in fork-tender beef that practically falls apart on the skewer. If you're short on time, marinate for a minimum of 2 hours, but don't skip this step entirely; it's what separates good kabobs from exceptional ones.
Prep and Assemble the Vegetables
While the beef marinates, prepare the vegetables by cutting the 2 whole red bell peppers into 1-inch chunks, removing the cores and seeds. Peel and cut the 1 whole yellow onion into 1-inch chunks, and slice the 2 medium zucchini into 1-inch thick rounds. Leave the 1 pint cherry tomatoes whole for skewering. Arrange all vegetables on a large baking sheet.
This is where organization matters. Group similar-sized vegetables together to ensure even cooking. For example, place the bell peppers and onions in one section and the zucchini and tomatoes in another. This prevents smaller pieces from overcooking while larger chunks catch up. Once prepped, you'll have everything ready to assemble the kabobs in one efficient motion.
Thread the Kabobs and Chill
Soak the 12 whole wooden skewers in water for 30 minutes to prevent them from burning on the grill. Drain and pat dry before using. Starting with the beef, thread 2-3 cubes onto each skewer, followed by 1 bell pepper chunk, 1 onion chunk, 1 zucchini slice, and 2-3 cherry tomatoes. Space the ingredients evenly to allow heat to circulate and prevent crowding.
Place the assembled kabobs on a platter and refrigerate for 30 minutes before grilling. This brief chilling period helps the skewers hold their shape and ensures the vegetables don't fall off when you transfer them to the grill. It also allows the flavors to meld slightly, giving you a more cohesive bite.
Grill to Charred Perfection
Preheat your grill to medium-high heat (400-425°F). Once the grill is hot, place the kabobs on the grates, leaving space between them for even cooking. Grill the beef side first for 8-10 minutes, turning occasionally, until it develops a deep charred crust and reaches an internal temperature of 145°F for medium-rare. The vegetables will take slightly longer, so keep an eye on them.
Flip the kabobs every 2-3 minutes to ensure all sides develop that coveted grill marks and char. The bell peppers and onions should soften slightly while retaining their shape, and the zucchini and tomatoes will blister and caramelize. If the vegetables start to char too quickly, move them to a cooler part of the grill. The goal is a balance of smoky, charred edges with tender interiors.
Finish with a Tangy Yogurt Dill Sauce
While the kabobs rest, prepare the sauce by whisking together 0.5 cup plain Greek yogurt, 1 tbsp lemon juice, 1 tsp ground black pepper, and 0.25 cup finely chopped fresh dill in a small bowl. This sauce adds a cooling contrast to the rich, charred flavors of the kabobs and ties everything together with its herby brightness.
Let the kabobs rest for 5 minutes before serving. This resting period allows the juices to redistribute in the beef, ensuring each bite is moist and flavorful. Serve the kabobs hot, drizzled with the yogurt dill sauce, and garnished with an extra sprinkle of chopped fresh dill. The sauce should cling to the skewers, enhancing the smoky, charred flavors with a creamy, tangy finish.
Pro Tips For Making Beef And Vegetable Kabob
- PREP PEPPERS AND ONIONS: DESCRIPTION: Cut them into 1-inch chunks—no smaller, or they’ll turn to mush before the beef is done. My first batch of kabobs had sad, soggy bell peppers because I went too small, and I’ve never made that mistake again.
- MARINATE CHUCK FOR 2 HOURS: DESCRIPTION: Chuck roast needs time to tenderize—skip the rush and let it soak in olive oil, garlic, and a splash of vinegar for at least 2 hours. I used to grill it straight from the fridge, and the outside would char while the inside stayed chewy.
- ALTERNATE VEGETABLES AND MEAT: DESCRIPTION: Thread them in this order: beef, zucchini, cherry tomato, onion, bell pepper, repeat. This keeps the zucchini from overcooking while the beef gets its sear, and the tomatoes stay intact instead of falling off.
- GRILL IN TWO BATCHES: DESCRIPTION: Crowding the grill lowers the heat, and you’ll end up with unevenly cooked kabobs. Work in batches—start with the beef and veggies, then add the rest once the first skewers are halfway done. Trust me, your grill will thank you.
Make-ahead tips for this recipe
Marinade Prep Ahead
Make the marinade up to 2 days in advance and store it in an airtight container in the fridge. I like to prep mine the night before so the beef gets maximum flavor infusion. Just
Skewer Assembly
Assemble the kabobs up to 4 hours ahead and refrigerate on a platter lined with parchment paper. This prevents the ingredients from sticking and makes grilling a breeze. I find that pre-assembled skewers hold their shape better when transferred to the grill, especially if you've chilled them for 30 minutes beforehand. 🪵
Vegetable Prep
Cut all vegetables 1 day ahead and store them in separate ziplock bags in the fridge. This saves time on grilling day and keeps them crisp. Just give them a quick rinse and pat dry before assembling.
The bell peppers and onions can even be roasted ahead of time if you prefer a softer texture. 🥒
Sauce Prep
Prepare the yogurt dill sauce 1 day in advance and store it in a sealed container. The flavors actually improve over time, becoming more vibrant.
I like to make a double batch so I can use it for other dishes too—it's perfect on grilled chicken or even as a dip for pita chips. 🥛
Grilling Timeline
For large gatherings, grill the kabobs in batches to avoid overcrowding. I recommend cooking 6 skewers at a time on a preheated grill at 400-425°F. This ensures each batch gets proper char and even cooking. Keep cooked skewers warm in a 200°F oven while finishing the rest. 🔥
Reheating Leftovers
Leftover kabobs reheat beautifully in a 350°F oven for 10-12 minutes until warmed through. For extra crispiness, broil for 1-2 minutes at the end. I also like to reheat them in a cast-iron skillet over medium heat to restore that charred crust. 💫
Nutrition facts
Frequently asked questions
Can I use metal skewers instead of wooden ones?
Metal skewers work perfectly and don't require soaking. They're especially useful if you're grilling over very high heat or using a grill basket. Just choose thick enough skewers (about 1/8-inch diameter) to hold the ingredients securely. Metal skewers also allow for easier cleanup and are dishwasher-safe.
What if I don't have a grill? Can I make these indoors?
Yes, you can easily adapt this recipe for indoor cooking! Use a cast-iron skillet or grill pan over medium-high heat for similar charred results. For extra flavor, finish under a broiler for 2-3 minutes to create grill marks. The vegetables will cook slightly faster indoors, so keep a close eye on them.
How do I prevent the vegetables from falling off the skewers?
Start by soaking wooden skewers for 30 minutes to prevent burning. For extra security, thread the beef first (it's denser), then alternate with vegetables. If using soft vegetables like tomatoes, place them at the end of the skewer. Chill the assembled skewers for 30 minutes before cooking—this helps everything hold together better on the grill.
Can I use different vegetables in this recipe?
This recipe works beautifully with many vegetable substitutes! Try mushrooms for earthy flavor, asparagus for a more elegant presentation, or eggplant for a meatier texture. For sweeter kabobs, swap in pineapple chunks or peaches. Just ensure your vegetables are cut to similar sizes so they cook evenly.
What's the best way to store leftover kabobs?
Store cooked kabobs in an airtight container in the refrigerator for up to 4 days. To maintain texture, keep the beef and vegetables separate. Reheat in a 350°F oven for 10-12 minutes or in a cast-iron skillet over medium heat. For best results, reheat only what you plan to eat immediately to preserve that fresh-off-the-grill flavor.