
Main Courses
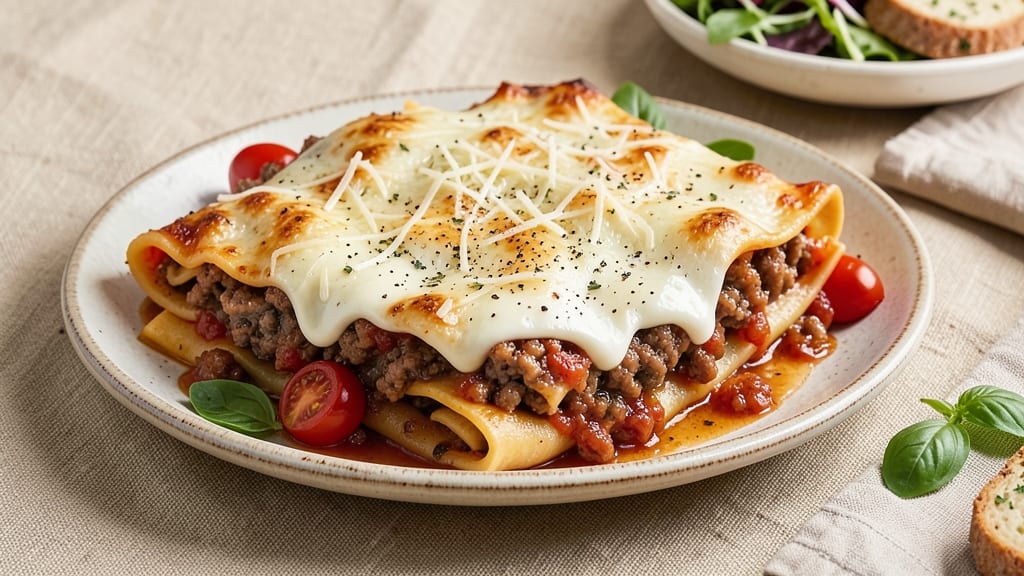
This beef and pork cannelloni recipe delivers restaurant-quality Italian comfort food with layers of savory meat and gooey cheese. 🔥 After perfecting this dish during my years in Charleston kitchens, I've refined it to balance rich, herbed meat filling with tender pasta sheets and velvety sauce.
The secret lies in slow-cooking the meat mixture until it's deeply flavorful yet tender enough to roll without breaking.
What sets this recipe apart is the combination of beef and pork—pork adds juiciness while beef provides depth, creating a filling that's more complex than traditional single-meat versions. We'll use store-bought pasta sheets for convenience without sacrificing quality, and a simple marinara or béchamel sauce that lets the filling shine.
The baking process transforms everything into golden, bubbling perfection with those signature cheese rivers oozing out when you cut into it.
This dish is perfect for special occasions or when you want to impress guests with authentic Italian flavors made at home. The technique is straightforward but requires patience for the meat cooking and assembly, resulting in cannelloni that looks impressive yet comes together with simple steps.
Each bite delivers that perfect balance of savory meat, creamy cheese, and rich sauce that makes it worth every minute of preparation.
Serve with a crisp green salad and garlic bread to soak up any remaining sauce. The leftovers reheat beautifully, making this an ideal meal for feeding a crowd or preparing ahead for busy weeknights. Let's create this showstopping Italian classic that'll have everyone asking for seconds.
Ingredients for beef and pork cannelloni
Pantry staples plus a few fresh ingredients for restaurant-worthy cannelloni at home.
| Ingredient | Amount | Notes |
|---|---|---|
| Ground Beef (80% lean, 20% fat) 🥩 | 1 lb | Finely ground for texture |
| Ground Pork 🐖 | ½ lb | Lean or regular, your choice |
| Large Eggs 🥚 | 2 whole | For binding filling |
| Lasagna Noodles (oven-ready) 🍝 | 12 sheets | Store-bought, no boiling |
| Ricotta Cheese 🧀 | 15 oz | Part-skim or whole |
| Mozzarella Cheese (low-moisture) 🧀 | 1 ½ cups | Shredded, block preferred |
| Parmesan Cheese (grated) 🧀 | ½ cup | Freshly grated from block |
| Garlic Cloves 🧄 | 4 cloves | Minced for meat filling |
| Yellow Onion 🧅 | 1 whole | Finely chopped |
| Fresh Parsley 🌿 | ¼ cup | Chopped, for freshness |
| Dried Oregano 🍃 | 1 tsp | Italian blend preferred |
| Ground Black Pepper 🌶️ | ½ tsp | Freshly cracked |
| Salt 🧂 | 1 ½ tsp | Kosher or sea salt |
| Olive Oil 🫒 | 2 tbsp | Extra-virgin for cooking |
| Marinara Sauce 🍅 | 2 ½ cups | Store-bought or homemade |
| Heavy Cream 🥛 | ½ cup | For béchamel base |
| All-Purpose Flour 🌾 | 1 tbsp | For roux |
| Butter 🧈 | 2 tbsp | Unsalted for béchamel |
The meat combo is key here—ground beef and pork together give that perfect balance of richness and tenderness. Grab 80% lean beef from the butcher section (ask for finely ground if pre-packaged isn't fine enough). Costco or local grocers usually have the best prices for bulk ground pork, and it's worth getting the regular kind for juiciness. Fresh garlic and parsley make all the difference—Trader Joe's has great pre-chopped garlic if you're short on time, but nothing beats mincing your own. For the cheese, block mozzarella shreds better than pre-shredded (which gets gummy), and Parmesan should be freshly grated—Whole Foods sells wedges perfect for grating.
No ricotta? Cottage cheese blended smooth works in a pinch—just drain off excess liquid first. Short on mozzarella? Fontina or Gruyère melts beautifully too. The béchamel can be made ahead and reheated—just whisk in a splash of milk if it thickens too much. For the marinara, Rao's or Barilla are solid store-bought options, but homemade with San Marzano tomatoes takes it to the next level. If you're making this ahead, cook the meat filling first and store it separately—it actually tastes better the next day once all the flavors meld.
This reheats like a dream—350°F for 20-25 minutes until bubbly. Leftovers keep 3-4 days in the fridge, and the filling freezes beautifully for up to 3 months. I always assemble mine the night before and bake in the morning—the cheese gets extra gooey that way. For serving, a sprinkle of fresh basil and extra Parmesan takes it from homey to restaurant-worthy. Don't skip the garlic bread—it's non-negotiable for soaking up all that delicious sauce.
Why You'll Love This Recipe
- No Boil Required: I swear by those oven-ready lasagna noodles—no pre-boiling, no waiting, just layer and bake. The ricotta filling stays perfectly creamy while the edges get that satisfying crisp, and honestly? It’s the kind of shortcut that makes weeknights feel like a victory.
- Double-Meat Magic: That 80/20 beef and pork combo? Rich, juicy, and impossible to resist. The pork adds a subtle sweetness that balances the beef’s depth, while the ricotta soaks up all the flavor like a sponge. (Yes, even my picky husband goes back for seconds.)
- Leftovers That Don’t Suck: This recipe actually improves the next day—crispier edges, flavors melded together, and zero soggy noodles. I freeze half immediately because reheating it is just as easy as the first time, and it’s the perfect lunch for lazy afternoons.
- Budget-Friendly Feast: You’re feeding a crowd for less than takeout, and the ingredients don’t break the bank. Ground beef and pork stretch far, ricotta adds creaminess without costing a fortune, and oven-ready noodles cut prep time in half. My wallet and my family thank me every time.
Step-by-step instructions for twin-meat cannelloni
Let's build these decadent cannelloni with layers of flavor and gooey cheese goodness.
👨🍳 Step 1: Cook the Twin-Meat Filling
Heat 2 tablespoons olive oil in a large skillet over medium-high heat. Add the 1 whole yellow onion and cook for 5 minutes until softened and translucent. You'll know it's ready when the onion releases easily from the pan.
Add the 1 lb ground beef (80% lean, 20% fat) and 0.5 lb ground pork to the skillet, breaking it up with a wooden spoon. Cook for 6-8 minutes until the meat is browned and most of the liquid has evaporated. You want to see those juices sizzle and evaporate—that's how you build deep flavor.
Stir in the 4 minced garlic cloves, 1.5 teaspoons salt, 0.5 teaspoon ground black pepper, and 1 teaspoon dried oregano. Cook for another 1 minute until fragrant. Remove from heat and let cool slightly for 5 minutes—this prevents the ricotta from curdling when mixed in later.
🥘 Step 2: Make the Cheesy Filling Mixture
In a large bowl, combine the cooked meat mixture with 15 oz ricotta cheese, 0.5 cup grated parmesan cheese, and 0.25 cup chopped fresh parsley. Mix gently with a fork until just combined—don't overmix or the filling will become dense.
Add the 2 whole large eggs one at a time, mixing gently after each addition. The filling should hold together when pressed between your fingers but still feel slightly moist. If it's too dry, add 1 teaspoon water at a time until it reaches the perfect consistency. This mixture will be your cannelloni's heart—rich, flavorful, and perfectly balanced.
🍳 Step 3: Prepare the Béchamel Sauce
In a medium saucepan, melt the 2 tablespoons unsalted butter over medium heat. Whisk in the 1 tablespoon all-purpose flour and cook for 1 minute until smooth—this creates your roux base. Slowly pour in the 0.5 cup heavy cream while whisking constantly to prevent lumps.
Continue cooking for 3-4 minutes until the sauce thickens enough to coat the back of a spoon. You're aiming for a velvety, creamy consistency that will cling beautifully to the noodles. Season with 0.25 teaspoon salt and 0.25 teaspoon black pepper to taste. Remove from heat and set aside—this creamy layer will bind everything together.
🥘 Step 4: Assemble the Cannelloni
Preheat your oven to 375°F. Spread 1 cup marinara sauce on the bottom of a 9x13-inch baking dish. This will prevent the noodles from sticking and create a flavorful base for your cannelloni.
Working quickly, spoon about 2 tablespoons of the meat-ricotta mixture onto each lasagna noodle sheet. Roll up tightly from the wide end, tucking in the sides as you go. Place the filled noodles seam-side down in the baking dish, standing them upright. Repeat until you've used all the filling and noodles, then pour the remaining 1.5 cups marinara sauce over the top.
🔥 Step 5: Bake to Golden Perfection
Cover the baking dish tightly with aluminum foil and bake for 25 minutes. This initial covered baking allows the cannelloni to cook through without drying out. After 25 minutes, remove the foil and sprinkle the 1.5 cups mozzarella cheese evenly over the top.
Return to the oven and bake uncovered for another 15-20 minutes until the cheese is golden brown and bubbly, and the edges are crispy. You'll know it's done when the cheese has melted completely and the sauce is bubbling around the edges. Let rest for 10 minutes before serving—this gives the filling time to set and makes slicing easier.
Pro Tips For Making Beef And Pork Cannelloni
- CRANK THE HEAT: Brown the ground beef and pork in two batches over medium-high heat—don’t skimp on the time. I learned this the hard way: rushing it means a mealy filling that won’t hold up in the oven. The fat should sizzle and the meat should crisp slightly before you even think about adding onions or garlic.
- SALT THE RICOTTA: Season the ricotta with at least 1 teaspoon of salt per pound—yes, even if it’s labeled "low-fat" or "part-skim." Ricotta’s milky sweetness needs the salt to cut through, and trust me, you’ll taste the difference when it’s folded into those noodles. (And if you’re using whole-milk ricotta, you’re already ahead.)
- DON’T OVERFILL THE NOODLES: Stuff the lasagna noodles with filling that’s about ¾ full—any more and they’ll burst when baking. I used to pack them like burritos, and half the time, the ricotta would ooze out like a sad, greasy surprise. Leave room for the cheese to soften, not explode.
- REST THE MEAT MIX: After cooking the beef-pork mix, let it cool for 10 minutes before stirring in the ricotta and eggs. This stops the ricotta from curdling into a grainy mess—something that’s happened to me more times than I’d like to admit. Patience here makes the filling silky, not gluey.
Regional styles of beef and pork cannelloni
Italian Grandma Style
In my grandmother's Tuscan kitchen, cannelloni were always made with a simple but rich meat filling—half beef, half pork—cooked low and slow with just garlic, onion, and a pinch of oregano.
She'd use fresh ricotta from the local farm and always added a splash of milk to keep the filling light. The secret was baking it in a heavy cast iron pan until the cheese turned golden and bubbly.
I still use her method today, though I've added a few modern shortcuts like store-bought noodles and pre-made marinara. 🧀
Roman Twist
Roman cannelloni often feature a lighter filling with more herbs like basil and parsley, and sometimes include a touch of lemon zest. The Romans also love using béchamel sauce instead of marinara, creating a creamy, rich version.
For an authentic Roman touch, add 1 tablespoon lemon zest to your filling and replace the marinara with a creamy béchamel sauce. Garnish with fresh basil leaves before serving for that classic Roman flair. 🍋
Southern Italian Fusion
In Southern Italy, particularly in regions like Calabria, cannelloni often incorporate spicy elements like chili flakes or Calabrian chili paste. For a spicy kick, add ½ teaspoon red pepper flakes or 1 tablespoon Calabrian chili paste to your meat filling.
Pair it with a marinara sauce that has a hint of sweetness from roasted tomatoes. This fusion brings a bold, spicy-sweet contrast that's perfect for those who love a little heat. 🌶️
American Homestyle
American versions often swap out some of the ricotta for cottage cheese to save money, and they might add extra cheese like provolone or cheddar for a gooier finish. For a hearty American-style cannelloni, mix in ½ cup shredded provolone cheese with the ricotta and mozzarella.
Use a thicker marinara sauce and add a sprinkle of crushed black pepper on top before baking. This version is all about comfort and indulgence—perfect for family dinners. 🍽️
Southeast BBQ-Inspired
Drawing from my years on the Southeast BBQ circuit, I've experimented with adding a smoky element to cannelloni. After cooking the meat filling, stir in 1 teaspoon smoked paprika and ½ teaspoon liquid smoke** (just a few drops) for a subtle BBQ twist.
Top with a mix of marinara and a thin layer of BBQ sauce before baking. This fusion brings a unique smoky-sweet flavor that's sure to impress. 🔥
Nutrition facts
Frequently asked questions
Can I use regular lasagna noodles instead of cannelloni sheets?
If you can't find pre-made cannelloni sheets, use 9-inch lasagna noodles that need boiling first. Cook them al dente (1 minute less than package instructions), drain well, and spread with filling before rolling. The key is to work quickly so they don't dry out while assembling.
How do I prevent the filling from leaking out when baking?
First, don't overfill the pasta sheets—2 tablespoons per noodle is perfect. Second, chill the assembled cannelloni in the fridge for 30 minutes before baking to help the filling set. Finally, bake covered with foil for the first 25 minutes to prevent premature cheese melting.
What's the best way to make this ahead of time?
Prepare the meat filling and assemble the cannelloni up to 24 hours ahead. Store uncooked in the fridge, covered tightly. When ready to bake, add 10-15 minutes to your baking time (cover for 30 minutes then uncover). For freezing, bake first, cool completely, wrap tightly, and freeze for up to 3 months. Reheat at 350°F until bubbly.
Can I substitute ground turkey or chicken for the pork?
Yes, but the texture will be leaner. For best results, use half ground turkey/chicken and half ground beef to maintain moisture. Add 1 tablespoon olive oil to the meat mixture to compensate for lost fat. The flavor won't be identical, but it works well for lighter versions.
Why did my cannelloni turn out dry?
Most likely your oven was too hot or you uncovered too soon. Keep the oven at 375°F and cover with foil for the full 25 minutes before adding cheese. Also check your filling moisture—it should hold together when pressed but not be bone-dry. A splash of milk in the ricotta mix helps too.