
Main Courses
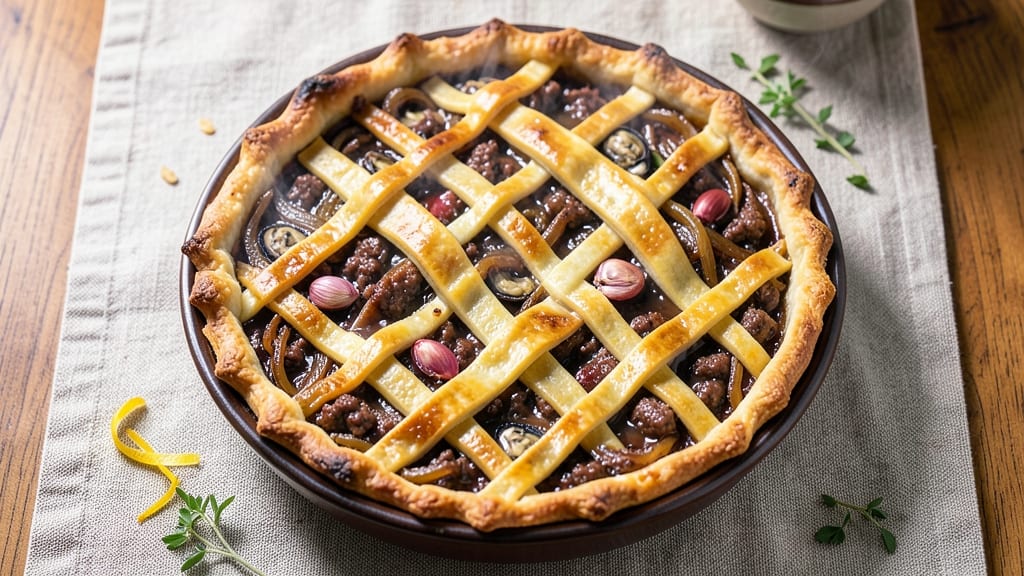
This beef and oyster pie recipe delivers restaurant-quality comfort with a flaky crust that encases a rich, briny filling of tender beef and plump oysters. The secret lies in slow-cooked beef that melts in your mouth and oysters that add a luxurious depth without overpowering.
I developed this version after years of perfecting the balance between traditional techniques and modern shortcuts—because great pie shouldn't require all day in the kitchen.
The filling starts with ground beef and onions caramelized until deep and aromatic, then simmered with garlic, Worcestershire, and a splash of sherry to build complex flavor.
Fresh oysters are added at the last moment so they stay tender and briny, their natural sweetness cutting through the richness of the meat. Meanwhile, a classic pie crust gets the flaky treatment with cold butter and proper resting time—no shortcuts here.
What you end up with is a golden, bubbling pie with a crisp crust that shatters at the edges and a filling so rich it feels like a hug in every bite.
The oysters add just enough briny contrast to balance the beef's savory depth, while the crust stays perfectly flaky despite the long baking time. This is the kind of pie that disappears quickly and leaves everyone asking for seconds.
Serve with a simple green salad and crusty bread to soak up every last drop of that savory filling. The recipe scales beautifully for gatherings, and leftovers reheat perfectly—though I can't guarantee they'll last that long. Let's get baking!
Ingredients for beef and oyster pie
Rich, briny, and flaky—this pie needs just 15 ingredients for restaurant-worthy comfort.
| Ingredient | Amount | Notes |
|---|---|---|
| Ground Beef 🥩 | 1 ½ lb | 80% lean, finely ground |
| Yellow Onions 🧅 | 2 whole | Sliced thin for caramelizing |
| Garlic Cloves 🧄 | 4 cloves | Minced, fresh preferred |
| Fresh Oysters 🦪 | 1 ½ lb | Shucked, liquid reserved |
| Worcestershire Sauce 🍶 | 1 tbsp | Anchovy-free version if needed |
| Dry Sherry 🍷 | ¼ cup | Or substitute dry white wine |
| All-Purpose Flour 🌾 | 2 tbsp | For thickening filling |
| Beef Stock 💧 | 1 cup | Low-sodium preferred |
| Unsalted Butter 🧈 | ¾ cup | Cold, cubed for crust |
| All-Purpose Flour 🌾 | 2 ½ cups | Plus 1 tbsp for dusting |
| Ice Water 💧 | ½ cup | For pie dough |
| Salt 🧂 | 1 ½ tsp | Kosher or sea salt |
| Ground Black Pepper 🌶️ | ½ tsp | Freshly ground preferred |
| Fresh Thyme Leaves 🌿 | 1 tbsp | Chopped, or 1 tsp dried |
| Egg Yolk 🥚 | 1 whole | For egg wash |
The beef and oysters are the stars here, so quality matters. Ground beef with 80% lean gives the right texture—too lean and it dries out. For oysters, local markets or seafood counters have the freshest, but frozen shucked oysters work in a pinch (thaw in fridge overnight). The sherry adds depth, but dry white wine works too if you're not stocked. Caramelizing the onions is non-negotiable—it takes 20 minutes, but that rich flavor is what makes this pie sing. Penzeys or bulk bins are great for fresh thyme if you want to splurge, but grocery store thyme works fine too.
No sherry? Dry vermouth or even more white wine keeps things balanced. Worcestershire sauce has anchovies, so if you're strictly pescatarian, check the label or use vegan Worcestershire. The pie crust relies on cold butter—take it out of the fridge 20 minutes before mixing so it's soft but not melted. For the filling, if you can't find beef stock, chicken stock with a splash of soy sauce works. The oyster liquid is key—don't drain it completely! That briny goodness is what ties everything together. And if you're short on time, pre-made pie crust from Trader Joe's saves 30 minutes (but homemade is worth it).
This pie tastes even better the next day—reheat covered at 350°F for 20 minutes. Keeps 3-4 days in the fridge, 2 months frozen. For serving, I like to brush the crust with extra egg wash right before baking—golden and shatteringly crisp. The filling reheats beautifully, so it's perfect for meal prep. Just don't skip the resting time after baking—10 minutes on the counter lets the juices set so every slice is perfect.
Why You'll Love This Recipe
- One-Pan Magic: I swear by this recipe when I need a meal that doesn’t require three different dishes. Brown the beef with onions and garlic first, then just toss in the oysters and Worcestershire—no extra pots, no fuss. That golden crust forms in the oven while I’m still wiping my hands.
- Umami Bomb: The oysters bring a briny punch, but it’s the Worcestershire sauce that ties everything together—deep, savory, and just a little mysterious. Honestly? That first bite where the rich beef meets the briny oyster? I’ll fight anyone who says it’s not worth the effort.
- Weeknight or Weekend: This pie works whether I’m feeding my family on a Tuesday or hosting a dinner party on Saturday. The filling’s hearty enough for a crowd but still cozy enough for a lazy night in. My husband even requests it when we have guests—(yes, even on a Tuesday night).
- Budget-Friendly Leftovers: Ground beef stretches far, and oysters in season are often cheaper than you’d think. The best part? This pie reheats like a dream, so I make a big batch and have filling lunches for days. Not the prettiest leftovers, but the taste makes up for it every time.
Step-by-step instructions for beef and oyster pie
Here's how to create a pie with a golden crust and rich, briny filling that's perfect for any special occasion.
Prepare the Filling with Caramelized Onions and Oysters
In a large skillet, melt 2 tablespoons of the unsalted butter over medium heat. Add the sliced yellow onions and cook for 15-20 minutes until deeply caramelized and golden brown. This step is crucial—it develops sweetness that balances the briny oysters.
Push the onions to one side of the pan and add the minced garlic cloves and 1.5 pounds of the ground beef. Cook until the beef is browned, breaking it into small pieces. Stir in the Worcestershire sauce and dry sherry, letting the alcohol cook off for 2-3 minutes until the aroma deepens.
Add the shucked oysters (reserve the oyster liquid) along with the beef stock, 2 tablespoons of all-purpose flour, 1.5 teaspoons of salt, 0.5 teaspoon of ground black pepper, and 1 tablespoon of fresh thyme leaves. Simmer for 10 minutes until the sauce thickens slightly. If it's too thin, mix 1 tablespoon of flour with 2 tablespoons of water and stir it in. The filling should coat the back of a spoon but remain velvety smooth.
Make the Flaky Pie Crust
In a large bowl, combine the 2.5 cups of all-purpose flour (plus 1 tablespoon for dusting), 1.5 teaspoons of salt, and 0.75 cup of cold, cubed unsalted butter. Use a pastry cutter or your fingers to work the butter into the flour until the mixture resembles coarse crumbs with pea-sized butter pieces.
Drizzle in the 0.5 cup of ice water and mix gently with a fork until the dough just comes together. Be careful not to overmix—handle it as little as possible to keep the crust tender. Divide the dough into two equal parts, flatten into discs, wrap in plastic, and chill for 30 minutes.
Preheat your oven to 375°F. Roll out one dough disc on a floured surface to fit a 9-inch pie dish, leaving a 1-inch overhang. Transfer to the dish, trim the edges, and crimp decoratively. Chill the crust while you prepare the filling.
Assemble and Bake the Pie
Pour the oyster and beef filling into the chilled crust, spreading it evenly. Roll out the second dough disc and cut it into strips for a lattice top. Arrange the strips in a crisscross pattern over the filling, leaving some gaps for steam to escape. Brush the lattice with the beaten egg yolk for a golden finish.
Bake the pie for 45-50 minutes until the crust is deep golden brown and the filling is bubbling. If the edges brown too quickly, cover them with foil. The pie is done when the filling is set but still jiggly in the center—it will firm up as it cools.
Let the pie rest for 1 hour before slicing. This resting time allows the filling to set completely and the crust to firm up. Serve warm with a simple green salad or crusty bread to soak up every last bit of the savory filling.
Pro Tips For Making Beef And Oyster Pie
- Sear the Beef First: Don’t just dump raw ground beef into the pot—break it into small chunks and sear them in batches over medium-high heat until deeply browned. I used to rush this, and the filling ended up bland. Those browned bits? They’re the flavor foundation. Let them crisp for 3-4 minutes per batch before stirring.
- Shuck Oysters Last Minute: Fresh oysters release liquid fast, so shuck them just before adding them to the filling. Toss them in raw, then let the hot filling cook them through for 2-3 minutes—no need to pre-cook. I learned this the hard way when my pie turned watery from pre-shucked oysters sitting too long.
- Deglaze with Worcestershire: After searing onions and garlic, splash in 1-2 tablespoons of Worcestershire sauce right away to scrape up the browned bits. This cuts down on cleanup and adds depth before the beef even hits the pan. Skip this, and you’re missing out on the umami punch.
- Use a Thickener, But Not Too Much: A slurry of 1 tablespoon flour + 1 tablespoon cold water per cup of liquid keeps the filling rich but not gluey. Stir it in during the last 5 minutes of cooking. I was skeptical until I tried it—now I double-check the ratio because over-thickening turns pie filling dry.
Essential equipment for this recipe
Pie Dish Essentials
A 9-inch deep-dish pie pan is ideal for this recipe, but a 9-inch standard pie dish works too if you prefer a slightly shallower profile. I recommend All-Clad stainless steel for even heat distribution, or ceramic for classic aesthetics. Avoid glass—it can crack under the filling's weight during baking. 🔥
Pastry Tools
Start with a pie crust roller (I love the OXO Good Grips model) to achieve the perfect ¼-inch thickness for your crust. A pastry brush (like Nordic Ware's silicone brush) is essential for egg wash application.
For shaping, keep a dough scraper and bench scraper handy to handle the dough without tearing.
Precision Measuring
Use a digital kitchen scale (I use OXO Good Grips) for accurate measurements of flour and butter—grams ensure consistency. A measuring cup set with leveling tools prevents overpacking flour. For liquids, a liquid measuring cup with markings ensures precise sherry and stock additions.
Heat Control Tools
A thermometer (like Thermoworks Smoke) monitors your oven's accuracy, crucial for even baking. For browning the crust, a pie bird (a wooden or metal venting tool) helps release steam while keeping the filling moist. A pie weights set (or dried beans) prevents a soggy bottom during pre-baking.
Oyster Handling
Shucking oysters requires a sharp oyster knife and mallet for safety. A fine-mesh strainer catches any debris when reserving oyster liquid. For storage, keep oysters in their shell on ice until ready to use—freshness is key for briny flavor. 🦪
Optional Upgrades
For a restaurant-quality finish, invest in a pie crust shield (like Wilton's) to protect the edges while baking. A pie stand elevates your pie for easy slicing. For reheating leftovers, a slow cooker on low keeps the filling warm without drying it out.
Nutrition facts
Frequently asked questions
Can I substitute shrimp for oysters in this recipe?
You can try, but the flavor will change significantly. Shrimp has a milder taste and less briny depth than oysters, which are key to balancing the rich beef filling. If substituting, use 1 pound of shrimp (peeled and deveined) and add 1 tablespoon of lemon juice to mimic the brininess. Cook shrimp for just 2-3 minutes before adding to the filling to keep them tender.
How do I prevent a soggy bottom in my pie crust?
Prevent soggy crusts by pre-baking the bottom crust for 10 minutes at 375°F before adding filling. Use a pie weight or dried beans to weigh it down. Alternatively, chill the filled pie for 30 minutes before baking to let the filling firm up slightly. For extra insurance, brush the bottom crust with a thin layer of egg white before adding filling.
Can I make this pie ahead of time?
This pie tastes even better the next day. Assemble the pie (without baking), cover tightly with plastic wrap, and refrigerate for up to 24 hours. Bake straight from the fridge, adding 10-15 minutes to the baking time. For longer storage, freeze the unbaked pie for up to 2 months. Thaw overnight in the fridge before baking.
What's the best way to reheat leftover pie?
Reheat slices in a 350°F oven for 15-20 minutes covered with foil to keep them moist. For quick reheating, use a microwave on 50% power for 30-45 seconds per slice. Avoid reheating in the air fryer—it can dry out the filling. The pie also reheats beautifully in a slow cooker on low for 1-2 hours with a splash of beef stock.
Is this recipe suitable for a large gathering?
Yes! This recipe scales perfectly for groups. For 12 servings, double all ingredients and use a 10-inch deep-dish pan. Bake time will increase by 15-20 minutes. Consider making two pies if you expect heavy demand. The filling can be made ahead and refrigerated for 24 hours, then assembled fresh before baking for maximum flavor.