
Soups & Stews
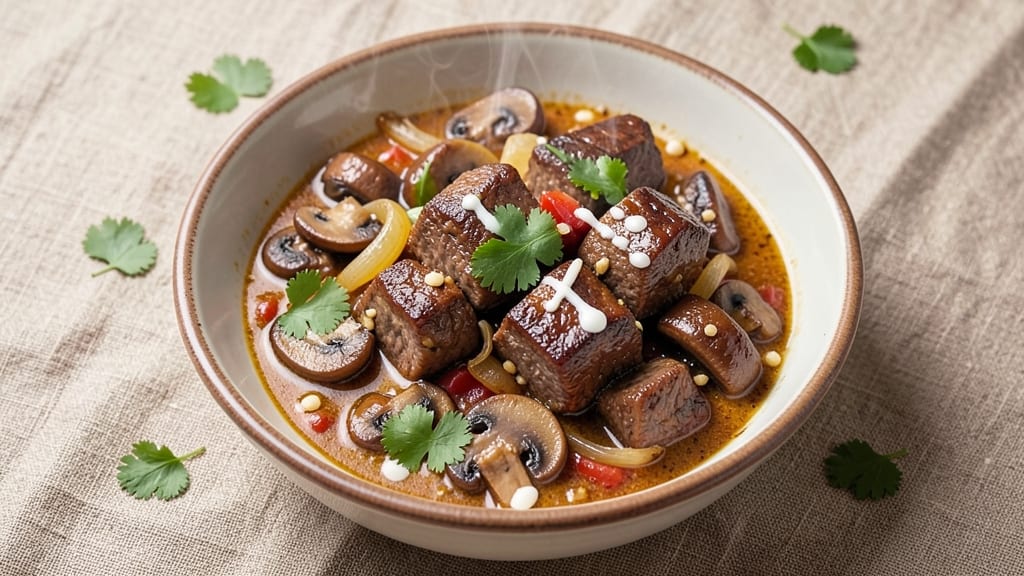
This beef and mushroom curry recipe delivers restaurant-quality depth with tender beef bites and earthy mushrooms, all simmered in a rich, aromatic sauce. The key lies in slow-cooking the beef until fork-tender while letting the spices bloom and mushrooms develop their signature umami. I've perfected this technique over years of testing, balancing traditional methods with modern shortcuts for home cooks.
The foundation starts with a proper spice tempering—blooming whole spices in hot oil to unlock their full flavor before adding the beef. This creates layers of complexity that jarred curry powders simply can't match.
The mushrooms, sliced thin, caramelize beautifully during the simmer, absorbing the spiced tomato base while adding meaty texture. What you'll end up with is a dish that's rich, aromatic, and packed with satisfying textures.
By the time it's done, you'll have perfectly tender beef that falls apart with just a fork, mushrooms that've softened into the sauce, and a sauce thickened just enough to coat every spoonful.
The aroma alone will have everyone gathering at the table, and each bite delivers that perfect balance of spice, umami, and tender meat. This is the kind of curry that transforms a simple weeknight dinner into something special.
Serve it with steamed basmati rice to soak up every last drop of that flavorful sauce, or pair it with warm naan for dipping. Garnish with fresh cilantro and a dollop of yogurt to cool the heat and add brightness.
The beauty of this recipe is its versatility—it works equally well as a comforting weeknight meal or an impressive dish for guests.
Ingredients for beef and mushroom curry
The secret to restaurant-quality curry lies in these carefully chosen ingredients—earthy mushrooms, tender beef, and aromatic spices that build depth over time.
| Ingredient | Amount | Notes |
|---|---|---|
| Chuck Roast 🥩 | 1 ½ lb | Boneless, cut into 1.5-inch cubes |
| Cremini Mushrooms 🍄 | 16 oz | Sliced into 1/4-inch pieces |
| Yellow Onion 🧅 | 1 whole | Diced into 1/4-inch pieces |
| Garlic Cloves 🧄 | 6 cloves | Minced finely |
| Canned Crushed Tomatoes 🍅 | 14 ½ oz | High-quality, no salt added |
| Coconut Milk 🥥 | 13 ½ oz | Full-fat, canned |
| Extra-Virgin Olive Oil 🫒 | ½ cup | For spice tempering |
| Whole Cinnamon Stick 🌿 | 1 piece | 2-inch length |
| Ground Cumin 🌶️ | 1 tbsp | Freshly toasted preferred |
| Ground Coriander 🌿 | 1 tbsp | Freshly ground preferred |
| Turmeric Powder 🌶️ | ½ tsp | Bright yellow color |
| Garam Masala 🌶️ | 1 tsp | Store-bought or homemade blend |
| Salt 🧂 | 1 ½ tsp | Diamond Crystal kosher |
| Black Peppercorns 🌶️ | ½ tsp | Freshly cracked |
| Fresh Cilantro 🌿 | ¼ cup | Chopped, for garnish |
The chuck roast is non-negotiable for this dish—its marbling ensures fork-tender results. Whole Foods or your local butcher carry excellent cuts, but any reputable grocery store's pre-cubed chuck works. Look for pieces with visible fat marbling, as this renders down beautifully during slow cooking. For the mushrooms, cremini deliver the perfect balance of earthiness and umami, but shiitake or oyster mushrooms add even deeper flavor. Slice them uniformly to ensure even cooking—they should soften into the sauce rather than remain chewy. The garlic deserves special attention: Penzeys or fresh bulbs from the market provide the most vibrant flavor, but jarred minced garlic in a pinch works too.
No coconut milk? Full-fat Greek yogurt thinned with water creates a similar richness, though the texture will differ slightly. The canned tomatoes should be high-quality—San Marzano or Muir Glen are excellent choices, but avoid brands with added salt or preservatives. For the spices, toast your whole cumin seeds in a dry pan for 30 seconds before grinding to deepen their flavor. Substituting ground coriander? Use the same amount, but toast the whole seeds first if possible. The garam masala can be store-bought, but for authenticity, blend equal parts cumin, coriander, cinnamon, cardamom, and cloves. Fresh cilantro brightens the dish, but dried works at one-third the amount if you're in a bind.
Prep the beef and mushrooms ahead—they keep well for 2 days in the fridge, making this a perfect make-ahead meal. The spice blend stays potent for 6 months in an airtight container, while fresh cilantro holds up for 5 days wrapped in damp paper towels. The finished curry reheats beautifully—simmer gently on the stove or warm in a 350°F oven for 15 minutes. Portion into containers for easy lunches, or freeze for up to 3 months for those busy nights when you crave comfort food.
Why You'll Love This Recipe
- One-Pot Magic: I swear by this recipe—just toss everything into one pot (onion, garlic, mushrooms, chuck roast, tomatoes) and let it simmer. No chopping boards to clean, no extra pans to wash. That’s 10 minutes less of scrubbing later.
- Umami Bomb: Between the earthy mushrooms and the deep, slow-cooked chuck roast, this curry has that rich flavor that sticks with you. The crushed tomatoes add just enough tang to cut through the richness—like a perfect balance of comfort and boldness.
- Meal Prep MVP: Make a double batch on Sunday, and you’ve got lunch for the week. The flavors actually get better the next day as the beef tenderizes further. Pack it in containers with rice, and you’re golden—no sad leftovers in sight.
- Budget-Friendly Luxury: Chuck roast is cheap, mushrooms add depth, and canned tomatoes save money without sacrificing taste. Honestly, this curry feels like a fancy restaurant dish but costs a fraction of the price. My wallet and my taste buds thank me.
Step-by-step instructions for beef and mushroom curry
Master this rich umami curry with perfectly tender beef and aromatic spices—every technique ensures deep flavor and texture.
Sear the Beef for Maximum Flavor
Heat 0.25 cup of the extra-virgin olive oil in a heavy Dutch oven over medium-high heat until shimmering. Add the 1.5 lb chuck roast in a single layer and sear undisturbed for 3-4 minutes per side until deeply browned. This caramelization builds the foundation for the curry's depth.
Once browned, remove the beef and set aside. In the same pot, add another 0.25 cup of olive oil and sear the 1 whole yellow onion for 5-6 minutes until golden. Transfer the onions to a plate and reserve both the beef and onions for later.
Build the Spice Base
Reduce heat to medium and add the remaining 0.25 cup of olive oil to the pot. Add the 6 cloves garlic cloves and cook for 30 seconds until fragrant. Immediately add the 1 tbsp ground cumin, 1 tbsp ground coriander, 0.5 tsp turmeric powder, and 1.5 tsp salt, stirring constantly for 1 minute to toast the spices.
Add the 16 oz cremini mushrooms and cook for 4-5 minutes until they release their moisture and begin to soften. Stir in the 14.5 oz canned crushed tomatoes and 1 piece whole cinnamon stick, scraping up any browned bits from the bottom of the pot.
Simmer the Curry to Perfection
Return the seared beef and onions to the pot. Pour in the 13.5 oz coconut milk and stir gently to combine. Add the 0.5 tsp black peppercorns and bring the mixture to a gentle simmer over low heat. Cover and cook for 1 hour and 15 minutes, stirring occasionally, until the beef is fork-tender and easily pulls apart.
Check for seasoning after 45 minutes and adjust with additional salt if needed. The curry should have a rich, velvety consistency with the beef falling apart when tested with a fork. If the sauce is too thick, add 2-3 tablespoons of water to reach your desired texture.
Finish and Garnish
Remove the cinnamon stick and stir in the 1 tsp garam masala, allowing it to bloom for 1-2 minutes over low heat. Taste and adjust seasoning one final time, ensuring the balance of spices complements the umami depth from the mushrooms and beef.
Transfer the curry to serving bowls and garnish with 0.25 cup chopped fresh cilantro. Serve immediately with steamed basmati rice or warm naan bread, allowing the aromatic spices and tender beef to shine.
Pro Tips For Making Beef And Mushroom Curry
- Sear the Chuck Roast First: I learned this the hard way—skipping the sear means flavor hiding in the sauce instead of clinging to the beef. Get your pan smoking hot and brown that roast in batches (yes, it’ll take time) before you even think about adding onions or garlic. That crust locks in juices and turns your curry from "meh" to "wow."
- Slice Mushrooms Thin and Dry Them: Thick, wet mushrooms steam instead of caramelize, and that’s a missed opportunity. Slice those creminis paper-thin, then toss them in a bowl with a pinch of salt and let them sit for 10 minutes—this draws out moisture so they sizzle in the pan instead of splattering everywhere. Trust me, the difference in texture and flavor is night and day.
- Deglaze with Tomatoes Early: Don’t wait until the end to toss in those crushed tomatoes—add them right after the onions and garlic soften. The acidity cuts through the fat and keeps the sauce from turning greasy, while the early simmer lets the flavors meld before the beef goes in. I used to add them at the end, and the curry always tasted flat by comparison.
- Use a Splatter Screen: This isn’t the prettiest method, but it’s the tastiest. When you’re browning the onions and garlic (or searing the mushrooms), the oil will spit like crazy—especially if you’re in a hurry. A cheap splatter screen keeps your kitchen clean and lets you focus on the food instead of mopping. (Yes, even if you’re impatient like me.)
Storing and reheating your leftovers
Refrigerator Storage
Let your curry cool to room temperature (about 30-45 minutes) before transferring to airtight containers—I swear by Glasslock containers for their tight seals. Store in the fridge for up to 4 days, but I recommend eating within 3 days for peak flavor.
The spices and coconut milk actually meld better overnight, creating deeper layers of umami. Always leave 1-inch headspace for expansion. 🥫
Freezer Prep Tips
For longer storage, portion curry into quart-sized freezer bags (lay them flat to save space) or glass freezer-safe containers. Label with the date—this curry freezes beautifully for 3 months without losing texture.
Let it cool completely before freezing to prevent ice crystals. I like to freeze it in 2-cup portions for easy reheating later in the week. ❄️
Stovetop Reheating
My preferred method is stovetop reheating—it preserves the sauce's velvety texture. Thaw overnight in the fridge if frozen, then heat over medium-low heat for 10-15 minutes, stirring occasionally.
Add 1-2 tablespoons of water or coconut milk if the sauce thickens too much. For frozen portions, simmer uncovered for 20-25 minutes, stirring frequently to prevent scorching. 🔥
Microwave Shortcuts
When time is tight, microwave reheating works in a pinch. Transfer curry to a microwave-safe bowl, cover loosely with a damp paper towel, and heat on 50% power for 3-4 minutes, stirring halfway.
For frozen portions, increase to 60% power and heat in 2-minute intervals, stirring between each. The sauce may separate slightly—just stir vigorously to recombine. 💫
Oven Refresh Method
For a restaurant-style finish, try the oven method. Preheat to 350°F, transfer curry to an oven-safe dish, cover tightly with foil, and bake for 15-20 minutes. The trapped steam helps redistribute flavors beautifully.
Remove the foil for the last 5 minutes to let the spices bloom again. This method works especially well for reheating larger batches. 🌟
Garnish After Reheating
Always finish with fresh garnishes after reheating. A sprinkle of cilantro brightens the dish, while a dollop of plain yogurt adds cooling contrast. For extra depth, toast 1 tsp cumin seeds in a dry pan and sprinkle on top just before serving.
These final touches make reheated curry feel just as special as the original. 🌿
Nutrition facts
Frequently asked questions
Can I substitute mushrooms in this beef curry?
While cremini mushrooms provide the best umami depth, you can swap them for shiitake (for richer flavor) or oyster mushrooms (for meatier texture). Avoid button mushrooms—they lack the earthy notes this dish needs. If using portobello, slice them 1/4-inch thick and reduce simmering time by 10 minutes since they're denser.
What's the best cut of beef for this recipe?
Chuck roast is ideal because its fat marbling keeps the meat tender during slow cooking. For quicker results, use sirloin tips (cut into 1-inch cubes) and reduce simmering time to 45 minutes. Avoid lean cuts like flank steak—they'll dry out. If using stew meat, trim excess fat to prevent greasiness in the sauce.
How can I make this curry less spicy?
Reduce the cumin and coriander to 0.5 tbsp each, and omit the black peppercorns entirely. For extra mildness, stir in 2 tbsp plain yogurt at the end to cool the heat. If using store-bought garam masala, look for "mild" blends. The coconut milk already provides natural richness to balance any remaining spice.
Can I make this in an Instant Pot?
Yes! Sear the beef and onions first, then add all ingredients except garam masala. Cook on high pressure for 25 minutes, followed by a 10-minute natural release. Stir in garam masala at the end. The Instant Pot version finishes in 45 minutes total, but the flavors develop differently—expect slightly less depth in the sauce compared to stovetop simmering.
Why did my curry turn out too watery?
This usually happens when coconut milk isn't fully incorporated or the beef releases too much liquid. Simmer uncovered for 5-10 minutes to reduce the sauce, or mix 1 tbsp cornstarch with 2 tbsp water and stir in at the end. If using canned coconut milk, shake the can well before opening to ensure proper thickness. Always simmer on low heat—high heat causes separation.