
Soups & Stews
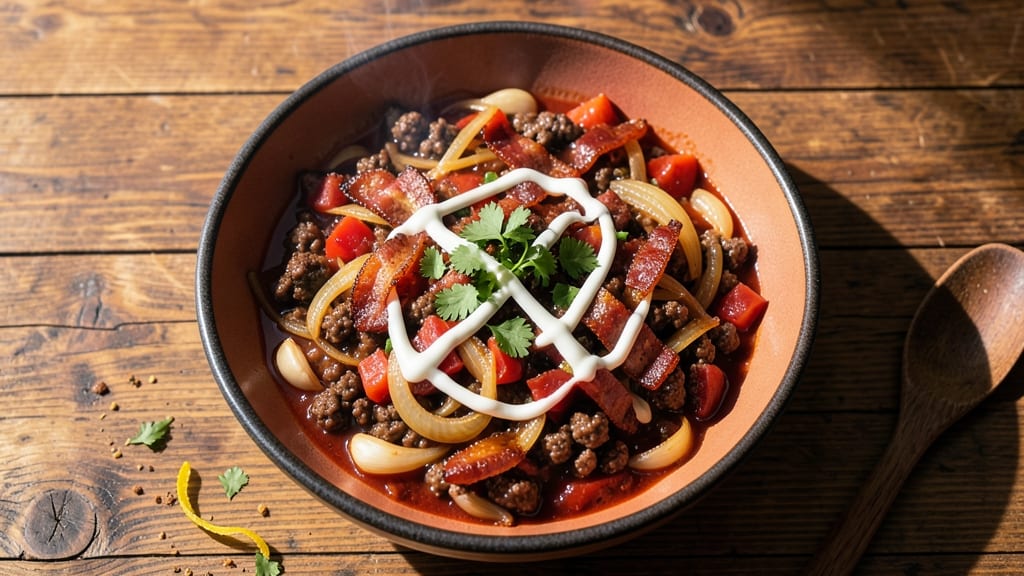
This beef and bacon chili recipe delivers smoky, spiced depth with perfectly caramelized onion bites that transform a simple pot into a flavor powerhouse. The combination of rich ground beef, crispy bacon, and slow-simmered spices creates a hearty stew that tastes like a hug in a bowl.
I developed this version after years of experimenting with chili recipes—balancing sweetness, heat, and savory notes takes practice, but the result is always worth it.
The secret lies in low-and-slow simmering, which allows all the flavors to meld together while the onions develop that irresistible caramelized sweetness.
Unlike quick chili recipes, this one rewards patience with layers of complexity—deep smoky notes from the bacon, earthy warmth from the spices, and a touch of tang from the tomatoes.
It’s the kind of dish that gets better as it sits, making it perfect for meal prep or feeding a crowd.
By the time you’re done, you’ll have a thick, velvety chili with tender beef, crispy bacon bits, and onions that are both sweet and slightly crisp at the edges. The texture is rich but not greasy, and the flavors are perfectly balanced—no single spice overpowers the others.
This isn’t just chili; it’s a restaurant-quality comfort food that’s easy to make at home.
Serve it with all the classic toppings—shredded cheese, sour cream, or fresh cilantro—but the chili itself is so flavorful, it’s delicious as-is. Whether you’re craving a cozy weeknight dinner or a hearty meal for game day, this recipe delivers bold, satisfying flavor without the fuss. Let’s get cooking!
Ingredients for beef and bacon chili
Rich beef, smoky bacon, and caramelized onions—this chili delivers deep, satisfying flavor with minimal effort.
| Ingredient | Amount | Notes |
|---|---|---|
| Ground Beef (Chuck Roast) 🥩 | 2 lb | 80% lean, finely ground |
| Thick-Cut Bacon 🥓 | 8 oz | Cut into 1/2-inch pieces |
| Yellow Onions 🧅 | 2 large | Thinly sliced, caramelized |
| Garlic Cloves 🧄 | 4 cloves | Minced, aromatic |
| Diced Tomatoes (15 oz can) 🍅 | 1 can | Fire-roasted preferred |
| Tomato Paste 🍅 | 2 tbsp | Smooth texture |
| Chili Powder 🌶️ | 2 tbsp | Medium heat preferred |
| Ground Cumin 🌿 | 1 tbsp | Toasted for depth |
| Smoked Paprika 🌶️ | 1 tbsp | For smoky flavor |
| Black Pepper 🌶️ | ½ tsp | Freshly ground |
| Salt 🧂 | 1 ½ tsp | Kosher or sea salt |
| Beef Broth 💧 | 2 cups | Low-sodium preferred |
| Dark Brown Sugar 🍚 | 1 tbsp | Balances heat |
| Apple Cider Vinegar 🍎 | 1 tbsp | Brightens flavors |
The beef and bacon are the flavor anchors here. Chuck roast ground beef stays tender while cooking, and thick-cut bacon delivers that irresistible smokiness. I grab mine from Costco for the best price, but any grocery store's pre-cut bacon works. The onions? Yellow onions caramelize best—skip the red or white. For the tomatoes, fire-roasted canned tomatoes add natural sweetness, but regular works too. The key is letting them simmer low and slow so all those flavors meld together.
No chili powder? Mix 1 tbsp paprika + 1 tsp cayenne for a quick swap. Short on time? Pre-cooked bacon bits save 20 minutes, though fresh is always better. The vinegar might sound odd, but it cuts through the richness and brightens everything. Substitute lemon juice if you're out. For the spices, Penzeys or bulk bins at natural food stores have the freshest options—just make sure your cumin smells toasty, not stale. The brown sugar might seem unusual, but it balances the heat beautifully.
This chili tastes even better the next day—honestly, 3-4 days in the fridge is ideal. Portion into containers for easy lunches, or freeze for up to 3 months. I always make a double batch because it disappears fast. For serving, keep the bacon crispy by adding it back at the end. The onions? Leave them slightly crisp—that’s the magic.
Why You'll Love This Recipe
- Here’s what sold me: crispy bacon edges that crumble into the chili like little flavor bombs. Thick-cut bacon means you get that perfect chew and smoky richness in every bite, and the fat renders out to keep the chili ridiculously tender. (Yes, even on a Tuesday night.)
- One-Pot Magic: I swear by this recipe because it’s literally one pot. No chopping onions into oblivion—just dice them roughly, toss them in with the bacon, and let the pan do the work. The onions caramelize right alongside the beef, so you get that deep, sweet crunch without extra effort.
- Smoky Bacon Boom: Here’s what sold me: crispy bacon edges that crumble into the chili like little flavor bombs. Thick-cut bacon means you get that perfect chew and smoky richness in every bite, and the fat renders out to keep the chili ridiculously tender. (Yes, even on a Tuesday night.)
- Leftovers That Don’t Suck: Between us, most chili leftovers turn into sad, watery mush. Not this one. The bacon fat locks in moisture, and the chuck roast stays juicy for days. I meal prep this for the week—just reheat and serve, no second-guessing.
Step-by-step instructions for beef and bacon chili
Here's how to build layers of smoky, caramelized flavor that make this chili unforgettable.
Cook the Bacon Until Crispy
In a large Dutch oven, cook the 8 oz thick-cut bacon over medium heat for 12-15 minutes, stirring occasionally, until deep golden brown and crispy. I like to break the bacon into ½-inch pieces as it cooks to ensure even browning and maximum flavor extraction.
This crispy bacon will form the flavor foundation of your chili. Don't rush this step—patience here means richer, more complex flavor later. Once the bacon is perfectly crisp, use a slotted spoon to remove it from the pot and set it aside on a paper towel-lined plate. Leave the rendered bacon fat in the pot; we'll use it to cook the onions and beef.
Caramelize the Onions for Sweet Depth
Reduce the heat to medium-low and add the 2 large yellow onions, sliced thinly. Cook them in the bacon fat for 15-20 minutes, stirring occasionally, until they turn deep golden brown and caramelized. You'll know they're ready when they smell sweet and syrupy—this is where the chili gets its natural sweetness.
Don't skip this step. The longer you cook the onions, the more flavor they develop. If they start to stick, just add a splash of water and scrape up any browned bits from the bottom of the pot. These bits are packed with flavor—don't waste them.
Brown the Beef and Add Aromatics
Increase the heat to medium-high and add the 2 lb ground beef (chuck roast). Break it up with a wooden spoon as it cooks for 5-7 minutes until it loses its raw color and becomes deep brown. This step is crucial for developing the meaty, savory base of your chili.
Add the 4 minced garlic cloves and cook for 30 seconds until fragrant. Then stir in the 2 tbsp tomato paste, spreading it evenly across the bottom of the pot to create a rich, concentrated layer. This paste will deepen the chili's color and flavor—don't skip it.
Build the Chili Base with Spices and Tomatoes
Stir in the 2 tbsp chili powder, 1 tbsp ground cumin, 1 tbsp smoked paprika, 0.5 tsp black pepper, and 1.5 tsp salt. Cook for 1 minute to toast the spices and release their aromas. Then add the 1 can diced tomatoes (with juices), 2 cups beef broth, 1 tbsp dark brown sugar, and 1 tbsp apple cider vinegar. Stir everything together well.
Bring the mixture to a gentle boil, then reduce the heat to low and let it simmer uncovered for 45-60 minutes, stirring occasionally. This simmering time allows all the flavors to meld together and develop that rich, smoky depth. The chili should reduce slightly and become thick and hearty.
Finish and Rest for Maximum Flavor
After simmering, stir in the crispy bacon you set aside earlier. Taste and adjust the seasoning if needed—you might want to add a pinch more salt or a touch more chili powder to suit your preference. Let the chili rest for 10 minutes off the heat before serving. This resting time allows the flavors to settle and the chili to thicken slightly.
Serve the chili hot, garnished with extra crispy bacon if you like. The flavors will only get better as it sits, so this chili tastes even better the next day. Enjoy with cornbread or crusty bread to soak up every last bit of that smoky, spiced goodness.
Pro Tips For Making Beef And Bacon Chili
- CRANK THE HEAT FIRST: Start your ground chuck on high heat until it loses its raw color—about 3-4 minutes—before adding onions or bacon. I used to simmer it right away, and the meat stayed greasy and bland. High heat sears the surface, locking in flavor and texture.
- CHOP BACON THIN, NOT CRUMBLED: Cut thick-cut bacon into ¼-inch strips, not tiny bits—this gives you crispy edges without losing it to the pot. I’ve burned chili waiting for crumbles to crisp; wider strips render faster and still deliver that smoky punch.
- SAVE THE TOMATO JUICE: Don’t drain the canned diced tomatoes—juice and all. That liquid is your chili’s lifeblood for moisture and acidity. I once skipped it, and the chili turned into a thick paste that needed watering down.
- STIR IN GARLIC LATE: Add minced garlic with the tomatoes in the last 10 minutes of cooking, not at the start. Raw garlic burns fast and tastes bitter—waiting lets it mellow into the sauce without overpowering. (Yes, even if you’re impatient like me.)
Pro cooking tips for beef and bacon chili
Low-and-Slow Simmering
This chili thrives on patience—simmering for 45-60 minutes at low heat builds deep, complex flavors. I use a Dutch oven because it distributes heat evenly and prevents scorching. Keep the lid slightly ajar to let excess moisture escape, which helps thicken the chili naturally.
If it gets too thin, simmer uncovered for 10-15 extra minutes to reduce it. 🌡️
Toast Your Spices
Never skip toasting your spices! Cook the chili powder, cumin, and smoked paprika in the pot for 1 minute before adding liquids. This step releases their essential oils, intensifying their flavors.
I like to use Penzeys brand spices—they’re consistently fresh and potent. If you’re short on time, toast them in a dry skillet first, then add to the chili. 🌶️
Bacon Fat is Liquid Gold
The rendered fat from the bacon is your secret weapon—it adds richness and helps caramelize the onions beautifully. After cooking the bacon, leave the fat in the pot and reduce heat to medium-low before adding onions.
If you’re concerned about excess fat, drain half after browning the beef, but leave some for flavor. Trust me, the chili won’t be greasy—it’ll be delicious.
Adjust Seasoning Gradually
Taste your chili as it simmers and adjust seasonings in small increments. Start with ½ tsp salt at a time—chili often needs more than you’d think. If it’s too spicy, balance it with a pinch of brown sugar or a splash of apple cider vinegar.
I like to add a pinch of cinnamon (just ¼ tsp) for warmth, but it’s optional. The goal is harmony, not overpowering heat. 💡
Rest Before Serving
Let the chili rest for 10 minutes off the heat before serving. This allows the flavors to meld and the texture to thicken slightly. During this time, the onions absorb any remaining juices, and the meat reabsorbs moisture, making every bite richer.
Pro tip: If you’re prepping ahead, let it rest in the pot for 30 minutes before transferring to serving bowls. ✨
Double Batch for Leftovers
This chili tastes even better the next day—honestly, I always make a double batch. The flavors deepen as it sits, and the onions become even sweeter. Store leftovers in airtight containers in the fridge for 4-5 days or freeze for up to 3 months.
When reheating, add a splash of beef broth to prevent drying out. Trust me, your future self will thank you. 💛
Nutrition facts
Frequently asked questions
Can I use ground turkey instead of beef?
Ground turkey works beautifully and makes this a lighter option. Use 2 lb 93% lean ground turkey and reduce cooking time to 4-5 minutes to avoid drying out. The flavor will be slightly milder, so add ½ tsp extra smoked paprika to compensate. For best results, use a mix of dark and white meat.
How do I make this chili less spicy?
Start by reducing the chili powder to 1 tbsp and omit cayenne if using. For existing batches, stir in 1 tbsp apple cider vinegar or 1 tsp brown sugar to balance heat. If needed, add a dollop of sour cream or Greek yogurt when serving. The vinegar in the recipe already helps moderate spice levels.
Can I add beans to this recipe?
Yes! For a heartier version, add 1 can (15 oz) kidney beans or black beans with the tomatoes. Drain and rinse them first, then simmer them directly in the chili. If using canned beans, add them during the last 15 minutes of cooking to prevent mushiness. For extra texture, try pinto beans instead.
What's the best way to reheat leftovers?
Reheat chili in a pot over medium-low heat for 10-15 minutes, stirring occasionally. For microwave reheating, transfer to a microwave-safe bowl and heat in 1-minute intervals on medium power, stirring between each interval. Always add 1-2 tbsp beef broth to prevent drying out.
Why does my chili taste bland?
Most likely, you need more salt or acid. Start with ½ tsp additional salt and taste again. If still bland, add 1 tbsp apple cider vinegar or a pinch of cinnamon (¼ tsp). For depth, try adding 1 tsp Worcestershire sauce or a splash of soy sauce. The key is building layers of flavor through proper browning and simmering.