
Main Courses
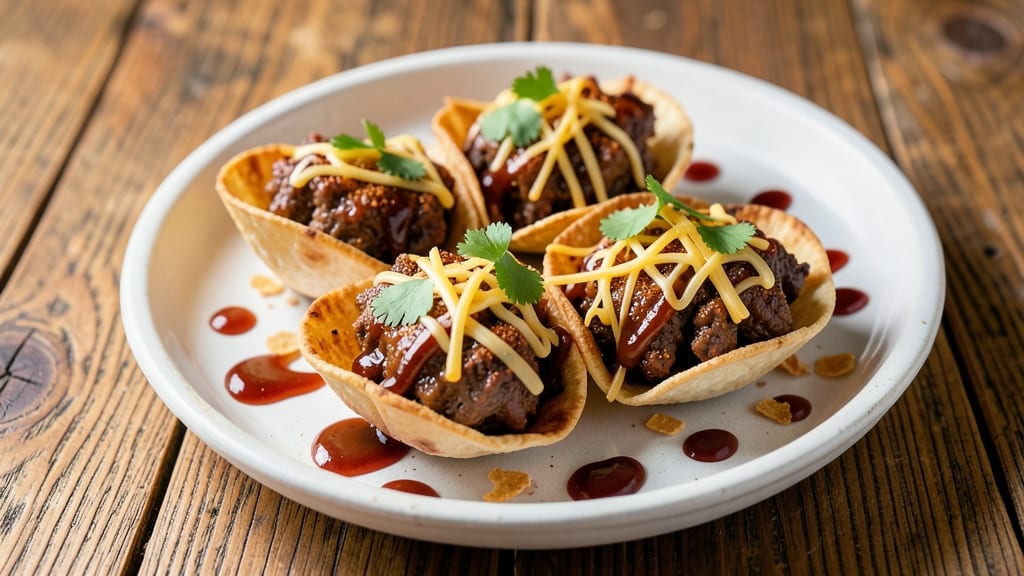
Barbecue beef cups transform ordinary appetizers into finger-licking bites that deliver restaurant-quality flavor in every tender, smoky-spiced tortilla cup. 🔥 As a pitmaster who grew up surrounded by slow-smoked ribs, I developed this recipe to bring that deep, caramelized flavor to handheld bites—perfect for game day or weeknight entertaining. The secret lies in the balance of ground beef seasoned with a smoky rub, wrapped in crispy tortillas, and baked until the cheese melts into gooey perfection.
This recipe delivers restaurant-quality results with minimal effort—just 15 minutes of prep followed by 10 minutes in the oven.
The ground beef gets a flavor boost from a dry rub of smoked paprika, garlic powder, and brown sugar, while the tortillas add a satisfying crunch that contrasts beautifully with the melty cheese.
The key to success is shaping the beef into compact cups before baking, ensuring each bite is packed with flavor and texture.
By the time these bite-sized masterpieces emerge from the oven, they'll be golden-brown and bubbling with cheese, with edges that are crispy enough to stand up to their own sauce.
The smoky aroma alone will have everyone reaching for seconds, and the combination of savory beef, tangy barbecue sauce, and creamy cheese creates a flavor profile that's impossible to resist.
Serve them on a platter with extra sauce for dipping, and watch them disappear faster than you can say "game time."
These barbecue beef cups are versatile enough to work as an appetizer or even a main course for a casual gathering. Pair them with a side of coleslaw or cornbread to round out the meal, and you'll have a crowd-pleasing dish that's sure to impress.
The best part? They reheat beautifully, making them perfect for meal prep or leftovers. Let's get cooking!
Ingredients for barbecue beef cups
Restaurant-quality barbecue flavor meets handheld convenience—just 12 smoky-spiced bites for your next game day feast!
| Ingredient | Amount | Notes |
|---|---|---|
| Ground Beef (80/20) 🥩 | 2 lbs | 80% lean, 20% fat preferred |
| Flour Tortillas 🌯 | 12 whole | Medium size, 8-inch diameter |
| Shredded Cheddar Cheese 🧀 | 4 cups | Sharp cheddar for best melt |
| Barbecue Sauce 🍅 | 1 ½ cups | Store-bought or homemade |
| Smoked Paprika 🌶️ | 2 tbsp | For authentic smoky flavor |
| Garlic Powder 🧄 | 1 tbsp | Freshly ground preferred |
| Brown Sugar 🍚 | 1 tbsp | Light or dark variety |
| Salt 🧂 | 1 tsp | Kosher or sea salt |
| Black Pepper 🌶️ | ½ tsp | Freshly ground for best flavor |
| Olive Oil 🫒 | 1 tbsp | For greasing tortillas |
| Yellow Onion 🧅 | 1 whole | Finely diced for garnish |
| Fresh Cilantro 🌿 | ¼ cup | Chopped for garnish |
The ground beef is where all the magic happens—80/20 fat ratio (not leaner!) gives you that juicy, tender bite. Walmart or Costco usually have it pre-ground, but if you're buying whole chucks, ask the butcher to grind it fresh. The smoked paprika is non-negotiable for that authentic pitmaster flavor—Penzeys or McCormick brands are my go-tos, but any good-quality smoked paprika works. Pro tip: Toast the spices in a dry pan for 30 seconds before mixing to wake up those flavors. And don't skip the brown sugar—it caramelizes during baking for that perfect balance of sweet and smoky.
No smoked paprika? Substitute 1 tbsp regular paprika + ½ tsp liquid smoke (trust me, it works). Running low on barbecue sauce? Mix ½ cup ketchup + 1 tbsp molasses + 1 tsp apple cider vinegar for a quick fix. The tortillas should be medium-sized (8-inch) for easy handling—Mission or La Tortilla Factory brands hold up best to baking. If you can't find shredded cheddar, grate your own block—pre-shredded gets gummy when melted. For extra crunch, brush the tortillas with olive oil before shaping, and sprinkle a pinch of salt on the cheese before baking—it makes all the difference!
These taste even better the next day—reheat at 350°F for 5-7 minutes until bubbly. Store leftovers in an airtight container for up to 4 days in the fridge, or freeze for 2 months (they thaw beautifully in the microwave). I always make a double batch because they disappear fast—portion into muffin tins before freezing for easy reheating later. Garnish with cilantro and diced onion right before serving so it stays fresh. Serve with extra sauce on the side for dipping—game day just got 10x better!
Why You'll Love This Recipe
- Five-Ingredient Magic: I swear by this recipe because it’s the kind of dish where you don’t need a grocery list—just what’s already in your pantry (or fridge). That 80/20 ground beef? It’s the secret—juicy, flavorful, and forgiving when you forget to preheat the pan.
- Smoky Cheese Overload: The smoked paprika in the beef and that melted cheddar? It’s like a hug in every bite. You’ll want to eat them straight from the pan, tortilla and all—no judgment here.
- Tailgate to Tuesday: Between us, these are my go-to for game days, lazy Mondays, or when I’m feeding a crowd without stress. Double the batch, pop them in the freezer, and reheat when needed. They’re the ultimate “set it and forget it” dish.
- Budget-Friendly Feast: Ground beef, tortillas, and cheese? This recipe stretches every dollar while still feeling special. Honestly, I make these more often than takeout—and my wallet thanks me for it.
Step-by-step instructions for smoky-spiced tortilla bites
Here's how to make these addictive barbecue beef cups—crispy, cheesy, and packed with smoky flavor!
🍳 Step 1: Brown the Beef with Smoky Spices
Heat a large skillet over medium-high heat and add the 2 lbs ground beef (80/20). Break it up with a wooden spoon as it cooks, letting the fat render out naturally. This takes about 5-7 minutes—don't rush it, or the beef will steam instead of brown.
Once the beef is mostly browned, reduce heat to medium and stir in the 2 tbsp smoked paprika, 1 tbsp garlic powder, 1 tbsp brown sugar, 1 tsp salt, and 0.5 tsp black pepper. Cook for another 2 minutes until the spices are fragrant and the beef is fully cooked through. This step builds the smoky foundation of your filling.
👨🍳 Step 2: Assemble the Cheesy Filling
Transfer the seasoned beef to a large bowl and stir in the 1.5 cups barbecue sauce and 4 cups shredded cheddar cheese. Mix until the cheese starts to melt slightly from the heat of the beef. The mixture should be moist but not soupy—if it's too dry, add 1-2 tablespoons of water to help the cheese melt evenly.
Here's the thing—sharp cheddar melts better than mild, so if you have it, use that. The cheese should be gooey enough to stick together when you press the filling, but not so runny it leaks out of the tortillas. Taste and adjust seasoning if needed—you want that perfect balance of smoky, sweet, and tangy flavors.
🥘 Step 3: Prepare the Tortilla Cups
Lightly brush each of the 12 flour tortillas with the 1 tbsp olive oil on one side. This prevents sticking and helps create crispy edges. Place a tortilla oil-side down in a 12-cup muffin tin and press gently to form the cup shape. You'll need to work quickly—use a second tortilla to press the first one into place if needed.
Repeat until all tortillas are in the muffin tin, making sure each one is fully seated in the cups. The oil helps them crisp up beautifully while keeping the filling contained. If any tortillas tear, simply press them into the tin anyway—they'll still hold together when baked.
🔥 Step 4: Fill and Bake to Golden Perfection
Divide the beef and cheese mixture evenly among the tortilla cups, pressing down gently to fill each one completely. The filling should come up to about ½ inch from the top—this ensures a good ratio of tortilla to filling. Sprinkle each cup with a pinch of smoked paprika for extra color and flavor.
Bake at 375°F for 12-15 minutes until the tortillas are golden brown and the cheese is fully melted and bubbly. The edges should be crispy while the centers remain soft and gooey. If the tops brown too quickly, tent loosely with foil for the last 2-3 minutes to prevent burning.
🍽️ Step 5: Garnish and Serve Warm
Remove the beef cups from the oven and let them cool for 2-3 minutes—just enough to handle them without burning your fingers. Transfer to a serving platter and garnish with the finely diced yellow onion and chopped fresh cilantro. The onion adds a sharp contrast to the smoky flavors, while the cilantro brings a fresh finish.
Serve immediately while the tortillas are still crispy and the cheese is melty inside. These bites are perfect for game day, parties, or as an appetizer when you want something hands-on and delicious. Don't skip the garnish—it makes all the difference in presentation and flavor!
Pro Tips For Making Barbecue Beef Cups
- CRANK THE HEAT FIRST: I learned this the hard way—skipping the high initial temp means your beef cups end up greasy instead of crispy. Sear the ground beef over medium-high heat for 3-4 minutes until it loses its raw color, then lower to medium. That first burst of heat locks in flavor and prevents soggy tortillas later.
- SALT THE BEEF BEFORE SEASONING: More salt than you think, especially if your tortillas are store-bought. Sprinkle 1 teaspoon of salt over the raw ground beef while breaking it apart—it seasons deeper than adding it later. (Yes, even if you're impatient like me.)
- DON’T OVERFILL THE TORTILLAS: I used to cram in as much beef-cheese mix as possible, and the edges would bulge like overstuffed dumplings. Fill each tortilla with 2-3 tablespoons of filling max, then fold tightly—this keeps them from bursting open when you bake them.
- SMASH THE TORTILLAS FIRST: This isn’t the prettiest method, but it’s the tastiest: press each tortilla flat with a rolling pin or your palm before filling. It prevents air pockets that make the cups puff up unevenly and guarantees a crispy, even texture when baked. (Your future self will thank you.)
Make-ahead tips for barbecue beef cups
Prep Ahead Strategy
Start by prepping the beef mixture 24 hours ahead—store the seasoned beef in an airtight container in the fridge. This lets the flavors meld beautifully, and you can even brown it the night before for a stress-free morning.
I always make the filling first thing, then let it sit at room temp for 30 minutes before assembling the tortillas. This helps the cheese soften slightly, making it easier to work with later. 💪
Tortilla Prep Shortcut
Brush the tortillas with olive oil and store them in a zip-top bag in the fridge for up to 4 hours before baking. This prevents them from drying out and makes them easier to shape later.
I like to prep the muffin tin setup ahead too—just press the tortillas into the cups and cover with a damp towel. When it's time to bake, simply fill and pop them in the oven. Trust me, this saves 10 minutes of last-minute chaos. ✨
Freezer-Friendly Assembly
Assemble the beef cups completely (filled tortillas in the muffin tin) and freeze them on a baking sheet for 1 hour to solidify. Then transfer to a freezer bag with parchment paper between layers.
Thaw overnight in the fridge before baking—just add 2-3 minutes to the bake time (they'll need 15-18 minutes total). I double-wrap these in foil before freezing to prevent freezer burn. 🥶
Reheating Like a Pro
For the best results, reheat frozen beef cups directly from the freezer. Place them in a cold oven and bake at 350°F for 20-25 minutes until golden and bubbly. If reheating from fridge, use 375°F for 10-12 minutes.
The key is low and slow—this prevents the tortillas from getting soggy. I always add a splash of water to the muffin tin before reheating to keep things moist. 🔥
Game Day Hack
Make a double batch and keep one tray in the fridge for 2-3 days—these reheat perfectly for last-minute gatherings. Store the extra filling separately and assemble fresh when needed. I keep prepped tortillas in the freezer too, so I can bake just the cups I need.
This is my secret weapon for spontaneous parties—no one will guess they were made ahead! 🌟
Make-Ahead Mistakes
Avoid prepping the cheese mixture too far ahead—it can get gummy when reheated. If storing the filling overnight, keep it covered with plastic wrap pressed directly on the surface to prevent drying.
And never freeze the assembled cups with wet tortillas—this leads to soggy bottoms. I've learned these lessons the hard way, so you don't have to! 💡
Nutrition facts
Frequently asked questions
Can I use lean ground beef instead of 80/20?
I recommend sticking with 80/20 ground beef for the best texture and flavor—it stays juicy and tender while cooking. If you must use leaner beef, look for 90/10 and add 1 extra tablespoon of olive oil to the pan to compensate for the lost fat. The fat is what keeps these bites moist and flavorful!
What if my tortillas tear when pressing into the muffin tin?
No problem! If a tortilla tears, simply press it into the muffin tin anyway—the filling will hold it together. For extra stability, use a second tortilla to reinforce the bottom. If you're worried about leaks, press the filling slightly lower in the cup. The key is to work quickly and keep the tortillas covered with a damp towel while prepping.
How can I make these vegetarian?
Swap the ground beef for 1 lb crumbled tempeh or seitan (for texture) mixed with ½ cup lentils for heartiness. Use the same spices and barbecue sauce, but reduce the cheese to 3 cups since plant-based fillings are less substantial. For extra flavor, add 1 tbsp soy sauce to the filling. The tortillas will still crisp up beautifully!
Can I bake these in a regular oven instead of a convection oven?
Regular ovens work perfectly—just increase the bake time by 2-3 minutes (aim for 15-17 minutes total). Rotate the muffin tin halfway through for even browning. If your oven runs hot, tent with foil for the last 2 minutes to prevent over-browning. The convection setting speeds things up, but your standard oven will still get the job done.
What's the best way to store leftovers?
Store leftovers in an airtight container for up to 4 days in the fridge. For longer storage, freeze them (unbaked) in a single layer on a tray for 1 hour, then transfer to a freezer bag with parchment between layers. To reheat, bake at 375°F for 10-12 minutes until crispy again. Pro tip: Freeze extras in muffin tins for easy reheating later!